WTF is Ngrok?

Ngrok better than sliced bread!

As a software engineer developing telecom based web applications, testing and validating software can be a major time sync.  How do you get your lab system on the Internet, accessible with a public IP, so you can test a Webhook or REST API for example?   What if you are working behind a router that has a dynamic IP address?   Reconfiguring your firewall for each test of the new code is a pain!  There has to be an easy way to enable testing without going through 20 acts of vaudeville to test your application code!
We recently discovered two tools that are now essential elements of our software engineering toolkit!   Ngrok is very creative service that solves many problems for testing network-based applications during the pre-deployment, development process.  Ngrok is a software service developed by Alan Shreve, clearly a genius,  who often goes by the name “Inconshreveable”!  In its simplest form, Ngrok is a solution that enables you to expose your lab web server which is normally installed behind a NAT or firewall, and connect with it over the Internet.   Ngrok makes it easy to set up a secure outbound SSL tunnel that can be reached by a hyperlink to a public IP.

Secure tunnels on Demand!

Ngrok is a powerful tool and Alan Shreve is an extraordinary personality!   He makes this available for free use!  No credit card required!   Just open an account here and give this a try!   Then download Ngrok to your local Windows, MAC O/S or Linux development platform, unzip it and run it with a very simple configuration command.   You might enter  “Ngrok http 80” into your terminal window to indicate that you have a web server listening on port 80 on your local machine.

Ngrok then displays a DNS link that you can point at to access and test your application.   Now you can demo without deploying, simplify mobile device testing, build webhook integrations or run personal cloud services from your own private network!   For a modest monthly fee, you can change the random number Ngrok generates for your unique link to a reserved domain name.  So https://92832de0.ngrok.io can become https://yourcompanyname.ngrok.io which will not change and is easy for you to deal with!  The free account generates a random number that will change each time you run Ngrok.   Using a reserved domain also makes webhooks a lot easier.  For example, when developing Twilio applications you would have to change your webhook every time you ran Ngrok.  The paid version enables a reserved domain name that you can now use to stabilize your Twilio webhook!

You can also build secure tunnels that are password protected and able to support multiple simultaneous connections.  Open http://localhost:404o on the platform running your Ngrok client and you can inspect and replay traffic:

We now regularly use Ngrok not only for development testing but also for remote support applications so we don’t have to worry about VPN credentials!    You can create TCP tunnels as easy as you set up HTTP tunnels!  This resource will save you more than enough time to pay the annual fee of $60 for a basic account (1 online process, 3 reserved domain names and eight tunnels per process).     Alan is online from time to time and otherwise provides a link to ask questions!   (Learn about Alan’s other projects here)!  No serious developer, network engineer or remote support technician can afford to be without this power utility! – DrVoIP
(As a product of the 60’s you might note that Grok was first used in “stranger in a strange land”, a SiFi novel.  Profound effect on most of the 60’s generation).

Configuring a SIP Trunk TIE Line between CISCO CUCM and ShoreTel iPBX

Merging Systems is fun and easy?

In a world of swirling mergers and acquisitions,  IT organizations are expected to integrate the different systems so that they all work together.   In the world of  IP PBX systems, that might result in having to make a ShoreTel system play nice with a CISCO system.  Actually, both systems support SIP and though it is sometimes more of an art than a science, it can be configured and made to work.   In fact we are seeing this request a lot lately.  Not sure why, but there are a lot of ShoreTel/CISCO integrations out there in the real world!   This video cheat sheet takes a look at a real world configuration from both the ShoreTel side and the CISCO side, so there is something for everybody who has to work with either or both systems.

Quick Topology Overview

In our example we have a CISCO Version 11 deployed in France and a ShoreTel version 14.2 CPE solution deployed in several NY locations.    This will be an interesting configuration as both systems have over lapping extension numbers.  For example, both systems have the range of 4100-4199 as extension numbers.  This along with a requirement for tail end hop off or TEHO at both ends makes for an interesting configuration puzzle.  We determined to take it a step at a time and get a basic SIP  TIE line working between the two systems.  Once that was up an operational, we could then focus on the basic dial plan strategy that would enable us to resolve the extension number conflict.

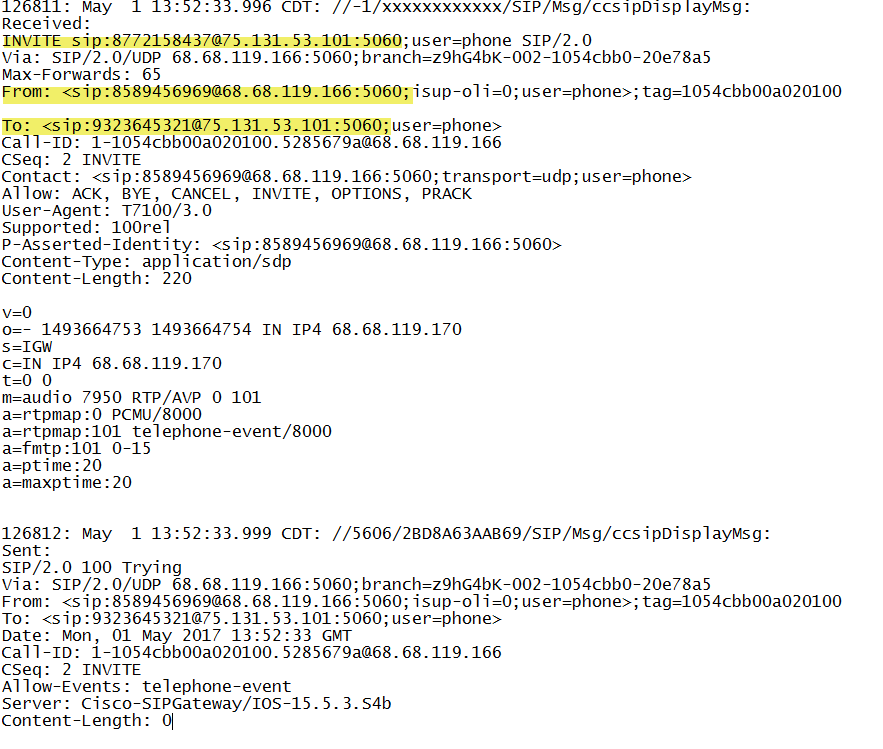
We are not going to use a session boarder controller at either end.   The good news is that it will greatly simplify the configuration as the two SIP proxies will directly exchange SIP messages.   In the case of the CISCO, the SIP trunk will originate on the call manager server itself and will terminate on a ShoreTel SG appliance (one of those orange boxes for you CISCO guys) with SIP Trunk resources sufficient for the number of channels you want to set up.    The bad news is, that on the CISCO side it makes trouble shooting a bit more time consuming.  If you had a CUBE in the mix you could easily open up CCSIP Messages in the debug on the IOS device, but when you do not have IOS you need to download logs from RTMT.  On the ShoreTel side, there is the ability to do a remote wire shark capture from the HQ server diagnostic panel using the SG appliance as the end point source.   (As a VOIP engineer SIP debugging should be second nature).

To avoid the use of a SBC on either end, we have to configure the solution entirely within a private IP topology.  In this case we have a 10.0.0.0 /24 network on the ShoreTel side and a 192.168.53.0/24 network on the CISCO side.   The WAN connection is an MPLS network.

ShoreTel and CISCO dial plan strategies

CISCO does not really care about over lapping extension numbers of difference in extension number ranges.  When I say, they don’t care, I mean they have a strategy for dealing with it.   You might have a multi-site deployment as a result of a recent acquisition and you have four digit extension numbers at one site, and five digit extension numbers at a different site.  CISCO can deal with this.  ShoreTel not so much.   With ShoreTel you would have to convert the four digit site to five digits (you can expand from four to five digits,  but not five to four) if you are going to have one dial plan.  In CISCO you could actually let both sites coexist with different extension number lengths.

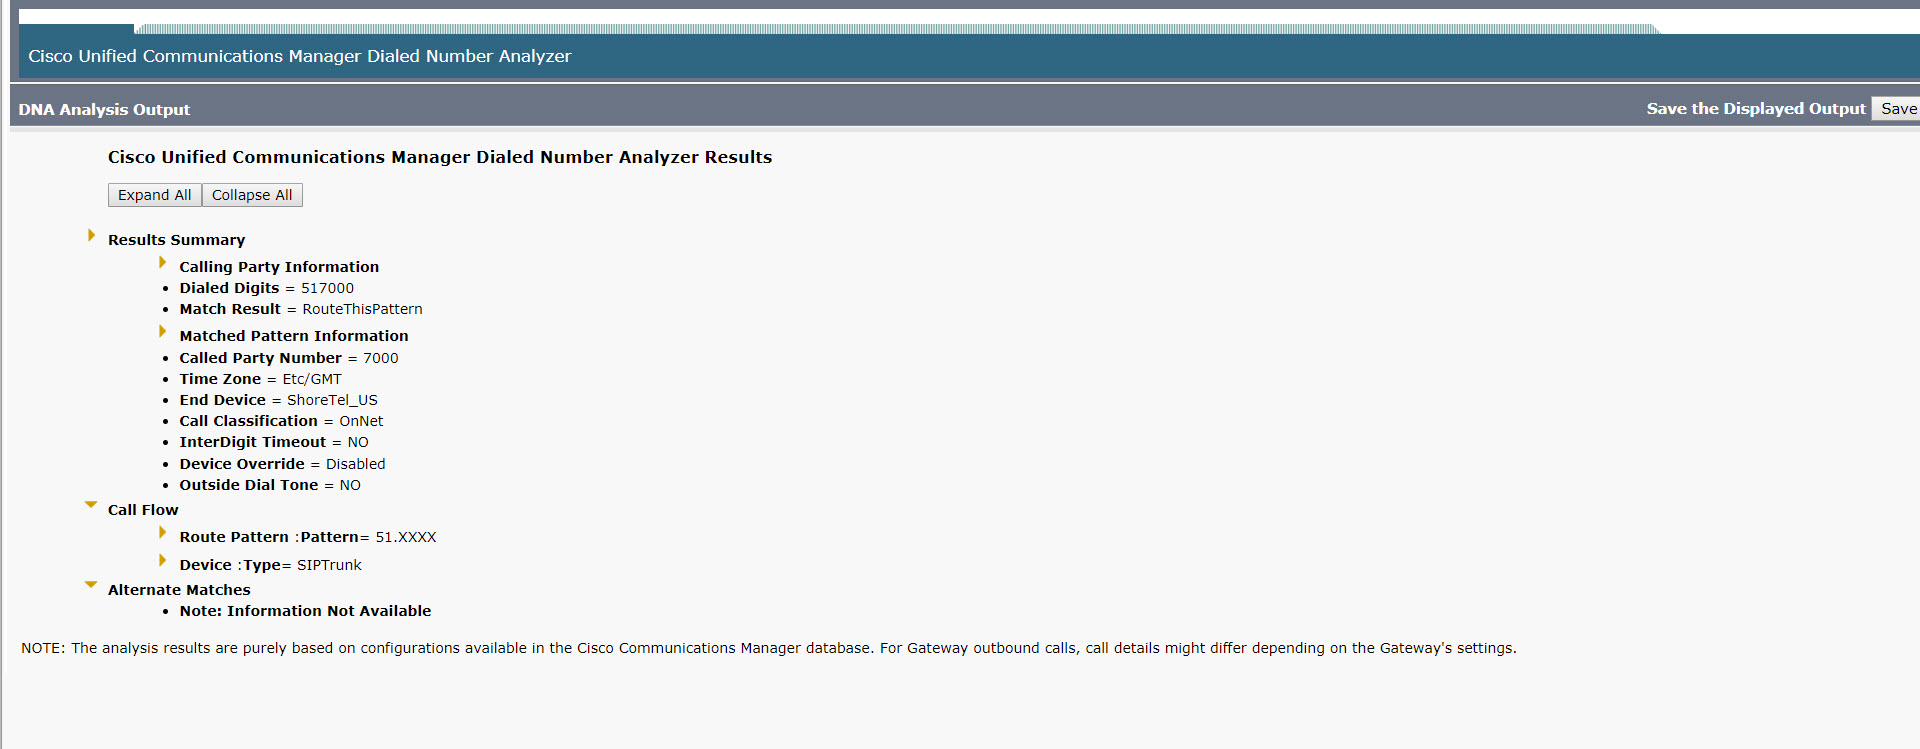
CISCO has a verbose dial plan strategy that expects you to create route “patterns” that when matched by dialed digits, point to a gateway or route list that contains a destination reachable by that route pattern.  In our example, we set up a dial pattern of 51.xxxx with a pre-dot discard that points to the SIP trunk TIE Line over to the ShoreTel.   The SIP Trunk configuration is relatively simple and is shown in the video below.

ShoreTel requires you to configure a Trunk Group and then put your individual trunks into the group.  These individual trunks are basically SIP channels and the video also shows this configuration.  The difference in the strategy of both systems is interesting to note.   CISCO is routing to this trunk group based on a route patter that matches dialed digits.  ShoreTel is going to want you to define both an access code and list out the OPX (off premise extension) numbers that this trunk can reach.

From a digits dialed perspective, ShoreTel is going to match the dialed digits against the list of OPX extensions to route calls over the Trunk Group that contains a matching OPX list.   Note that no access code will be required, though it will be required in the Trunk Group configuration.

SIP Trunk Group Profiles

Both systems required a reference to a SIP Profile that defines specifics of the call setup messaging.    Sometimes this is a bit more of an art than a science and it may take a bit of tweaking.   CISCO has a standard SIP Profile and an associated SIP Security profile both of which will be referenced in the SIP trunk configuration.  The only change I typically make to the SIP Profile on CISCO is to activate the “enable PING option” so that I can keep track of my trunk status which would otherwise be “unknown”.

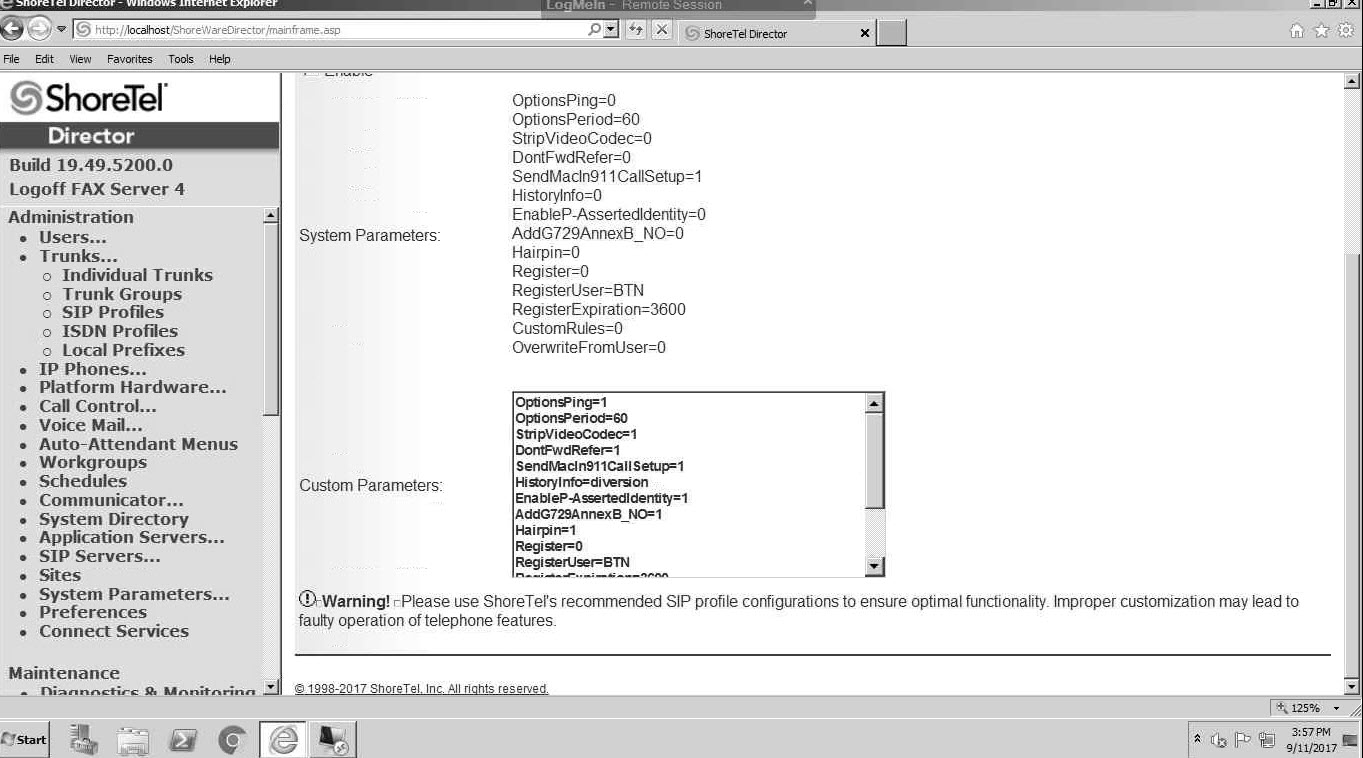
I made all my SIP Profile changes on the ShoreTel Trunk side.   This is the  list of configuration options we applied and it was the result of trying and retrying, so this list alone should be worth the blog read as it most definitely works in our example:

OptionsPing=1
OptionsPeriod=60
StripVideoCodec=1
DontFwdRefer=1
SendMacIn911CallSetup=1
HistoryInfo=diversion
EnableP-AssertedIdentity=1
AddG729AnnexB_NO=1
Hairpin=1
Register=0
RegisterUser=BTN
RegisterExpiration=3600
CustomRules=0
OverwriteFromUser=0
1CodecAnswer=1

If you have never configured a ShoreTel SIP Profile, the video walks you though this in detail.  ShoreTel provides a “standard tie-line” sip profile and suggests that you use it.  In fact if you change it, they generate a strong message urging you not to do so, but change it we did to the settings above and we had a more than acceptable result.

Extension conflict resolution

ShoreTel trunks do not out of the box allow abbreviated dialing.  The Standard ShoreTel domestic dial plan really wants what amounts to an E164 format.   ShoreTel will take all digits dialed and attempt to construct a +1 NPA – NXX – XXXX dial string.   So in this example, we are not going to be able to dial 51 as an access code on the ShoreTel side, then output only four digits.  Not going to work.    As outlined above, ShoreTel will want you to define the OPX extension reachable by the encapsulating trunk group in a detailed list as part.   The good news is that this means that you only have to dial the distant extension number and ShoreTel will see it as an OPX and route it over the associated trunk.

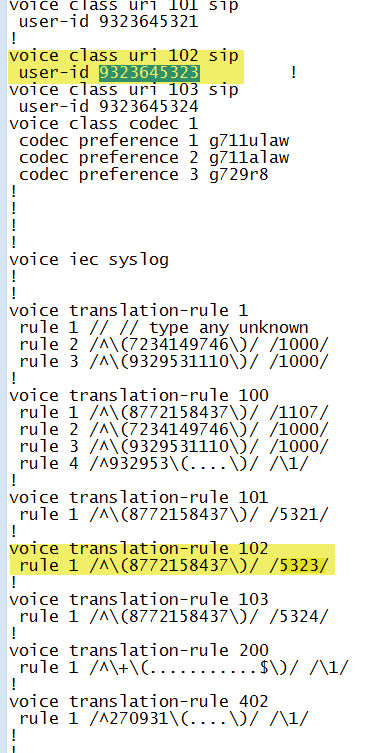
Clearly this means these extensions are unique.   What are we going to do? We have extensions on both sides of the TIE Line that are not unique, they are the same 41xx.   ShoreTel will allow you to create translation table to over come this limitation.   We could create a range of 61xx for our OPX list and then convert it to 41xx in the translation table and that would eliminate our problem.  Not my favorite solution but it may be the one we have to go with.   The down side is that we have no eliminated the 61xx range for use on the ShoreTel side.   Additionally, it is not very friendly to directory systems as people have to remember that if you are calling 4304 in France from New York, you need to dial 6304 not 4304 another colleague in NY!

Ideally we want to make use of that access code.  It would be nice to dial 51 + XXXX and be done with it, but as previously explained ShoreTel does not easily support that option.   It may be possible to write a custom dial plan and apply it to this specific trunk group.   For example, when working with paging adapters that have zones, you want to dial the paging amplifier and then dial your zone.   The custom dial plan for this would by “;1I” but you would still have to dial an OPX number.   For example, you would create the trunk group and maybe put 1234 as the OPX which would route the caller to the paging adapter.  The custom dial plan rule would be interpreted by ShoreTel as “do not echo any digits” enabling the paging adapter to play a second dial tone, and then you could touch tone out some digits.   Sounds like this would be a good solution but you would end up dialing eight digits, but it would free up a range of extensions that might otherwise be eaten alive by the required translation table.
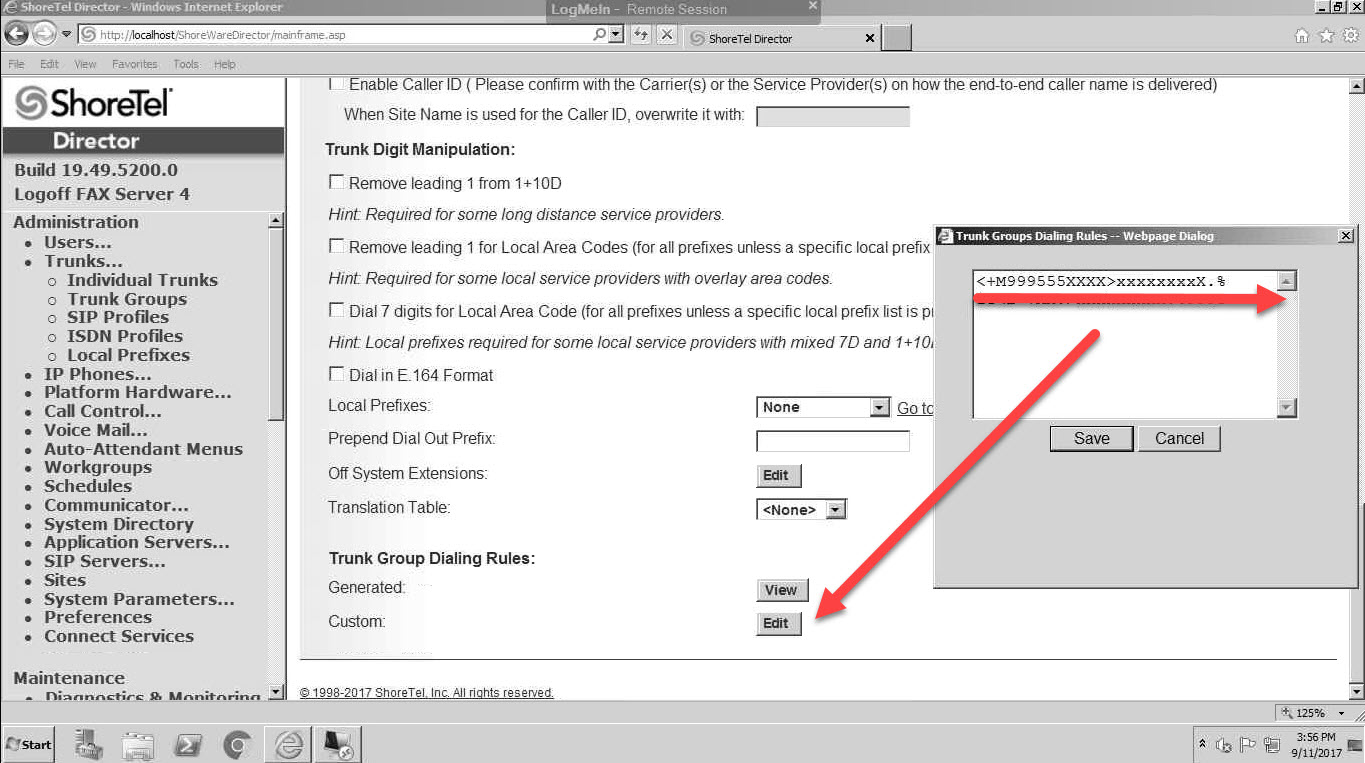
ShoreTel Update

At the end of the day, the solution was to create a custom dial rule and apply it to the ShoreTel Trunk Group.  Users inside the ShoreTel would dial 50+xxxx but as a result of the custom dial rule, the ShoreTel would see 999-555-xxxx and only pass the xxxx.   Remember that ShoreTel wants you to list the extension numbers on the other side of the TIE line in the OPX list of the Trunk Group.  In a situation in which you have extension conflict you can use a translation table, but often that is not the most friendly solution.  Ideally you will want to dial and access code, get connected to the distant phone system and then out dial the extension digits regardless of extension conflict.   To do this on a ShoreTel system will require a custom dial plan modification to the trunk group.  The document on this subject is very limited so you either have to pay ShoreTel  Professional Services or be prepared to play detective.  We went the detective route, so hit us up for the solution.


An IP Blue soft-phone tool kit for serious CISCO voice engineers!

The trials of a Call Center Engineer!

As a consulting engineers, we spend a lot of time working remotely over a VPN connection!  Testing configurations, features and CSS access requires end points!  Typically more than one end point device!   Scripting for the call center applications is even more demanding as you need to be able to test call flows.  Now a VPN over CISCO Anyconnect that allows you to work long hours remote is always nice, is not the same as a point to point VPN.  You might get one IP Communicator up on your local machine, but it is often not practical to register multiple devices.  When testing a UCCX scripts you need multiple Agent and Supervisor Phones to really ring out (pun intended) your call flow.  How best to do this?

Enter IP Blue!

I was taking a CISCO certification class and noticed that the instructor somehow managed to get multiple IP communicators up on his desktop.  I immediately realized the value this would have for UCCX scripting in particular and CISCO CUCM work in general.  I did a bit of research and found a company named IP BLUE Software Solutions, the industry’s best kept secret!  They make some really innovative products, but the one that I now can not live without is the “VTGO-PC Multilab Softphone” a product without equal and one that is a must have for every serious CISCO VoIP Engineer.   With this product I can open some 5-8 7960 type CISCO phones on my desktop, all registered to call manager with individual extension numbers and separate sound interfaces (i.e. speakerphones).   I used to have one IP Communicator and one X-lite SIP phone open on my desk and that was the best I was able to do remotely.  Now I can open an entire call center on my desk!  Astonishing!


Softphone Feature Set

These softphones are fully featured CISCO 79XX models ranging from the 7960 through the 7975 and are completely configurable.   When working with multiple clients I can setup a phone for each system I remote into!  I can even right client on the Instance name and change it to a client name for future reference and quick setup when working on multiple simultaneous deployments! When working on a Call Center I can bring up a few agents, a supervisor and exercise the script for all the possible scenarios.  All on a single desktop!

The feature set includes some really nice, not CISCO features, like an answering machine function!  Very Powerful! Multiple softphone instances can run on a single PC, connecting to the same or different Call Managers.  Each softphone instance is independent from another, and can call any phone including other softphone instances.  This setup allows to easily simulate various call scenarios, verify Call Manager settings, troubleshoot VoIP issues and configure Call Center Scripts results!   If you are running a  lab while preparing for some certification exam, this tool is going to not only save space and electricity, but lower the overall air conditioning requirements!  Here are some of the other features:

  • Emulates Cisco 79xx line of IP phones with dual 14 button expansion modules
  • Tested and certified with CallManagers 3.2-4.1, CallManager Express
  • Supports Cisco Survival Remote Site Telephony, redundant CallManagers, DHCP option 150
  • High quality-low latency using multiple codecs (G.711, GSM 6.10, G.729), QoS support
  • Accessibility features for visually impaired users include text to speech and keyboard shortcuts
  • Supports Extension Mobility
  • XML telephony services
  • Configuration Wizard with user-definable profiles
  • Supports a wide range of external USB audio devices
  • STUN/UPnP NAT traversal, SKINNY fix-up protocol friendly
  • Call log with Callback
  • Call recording, storage and playback with email attachment
  • Integration with LDAP directories, MS Outlook, Windows Address Book, Instant Messengers (Microsoft, Yahoo, AOL)
  • Language Localization (English, Dutch, Danish)
  • Dialing from MS Outlook, Web pages and much more

This is the best kept secret in the industry and if you are a serious student or working engineer doing anything with the CISCO Collaboration suite, you need to own this software.  If you boss will not spend less than hourly rate he bills you out at, get it yourself!  The time you implementation and troubleshooting time you will save, will more than pay for itself in increase leisure and family time!    We rarely pitch products on this site, but this product was just so astonishing we had to share it with our readers!


CUBE SIP Header Matching – Extracting DNIS from a Toll Free Number!

The Problem – Call Forwarding DNIS to Toll Free Numbers

Recently we were presented with a new challenge while deploying a Call Center based on the CISCO UCCX Version 11.5 feature set. Generally, we employ DNIS as a strategy for defining the CSQ  service parameters.   The more specific you can make the inbound number, the less you will need to “prompt and collect” digits from your caller.   A call to a specific DNIS number can separate the English callers from the other language options, or route “customer service” differently than routing “technical support”.   DNIS is always a preferred routing strategy.    Using DNIS we can design a single call routing script that can  pull in the CSQ name; offer up the proper audio menu’s; provide unique queue handling options and customize the caller experience all based on the dialed number.

In this centralized scheduling application for a large national medical practice, patients would call a local number in their community.   This number was then forwarded by the carrier to a toll free number that rang into the centralized CISCO cluster and UCCX call center.   The issue was setting up the dial peers to address the number the caller dialed, not the toll free number.   These numbers terminated on a SIP trunk that was serviced by a CISCO CUBE and the number presented was the 10 digits of the toll free number.   The DNIS number, or the number that the caller originally dialed may or may not be buried in the TO field of the incoming SIP headers.

Solution – Step 1 Debug Captures of inbound SIP messages

We need to setup “debug ccsip messages” and “debug voice ccapi inout” and make some test calls.   We need to understand how the carrier is handling the forwarded number.    In the log output below we can see the INVITE is the 877 toll free number.   The number that the caller dialed is the 9323646969 number and we can see that it is in the TO filed of the sip message headers.   We will need to write a dial-peer,voice class uri,  translation rule and profile that extracts the TO field and routes on that number rather than the original INVITE.   It is the “voice class uri” that is most magical in this solution.   (Note that we got luck here and the carrier was handling the call forwarded number in a manner that was appropriate to our goals.   This however is not always the case)!


Solution Step 2 “Voice Class URI”

In this example, the caller is dialing 93236453XX which is being call forwarded to the  toll free 877 number and shows up in the sip headers in the TO field.   The solution here is to create a “voice class uri”  rule.  In the snippet below we can see “voice class uri 102 sip” with a “user-id of 9323645323” as an example.   We are going to ultimately want to translate this to a four digit extension number 5323 and this is done with the traditional translation rules.  In this example “voice translation rule 102” does this conversion.  Note however that the translation rule refers to a match on the 877 toll free number, not the  9323645323 number.  This is where the magic of  “voice class uri”, the ability to do dial-peer matching based on the uri.

The Voice Class uri is structured such that it has a unique TAG and then a matching expression or host IP address.   The the snippet below we can see two attemtps to setup up a uri filter based on the last digits in the TO field of the SIP header.  Tag 102 looks to match 5323 and tag 103 looks to match 5324:

Solution Step 3 Dial Peer Matching

The call flow is dictated by dial-peer matching.   From the following snippet:

dial-peer voice 103 voip
translation-profile incoming 5324
session protocol sipv2
incoming uri to 103
voice-class codec 1
voice-class sip bind control source-interface GigabitEthernet0/0/0
voice-class sip bind media source-interface GigabitEthernet0/0/0
dtmf-relay rtp-nte
no vad

!

dial-peer voice 102 voip
description Incoming – FAX DID
translation-profile incoming 5323
session protocol sipv2
incoming uri to 102
voice-class codec 1
voice-class sip bind control source-interface GigabitEthernet0/0/0
voice-class sip bind media source-interface GigabitEthernet0/0/0
dtmf-relay rtp-nte
no vad

We can see that the voice class reference is applied to the dial-peer much the way a voice translation-profile is applied with the expression “incoming uri to 102” which sets up a filter to match for the number  9323645323.  Note that the dial peer matches the voice class but it is the translation-profile incoming 5223 that changes the ten digit number of the URI to the desired four digit extension.  In fact if you study the voice-translation rule 102 rule 1, references the toll free number!

These tools, the voice-translation rule and the voice-class uri work together to enable us to route and match dial-peers on information in the uri and not necessarily the original INVITE sip: number! Way powerful!


WANtelligence – Software Defined Networks!

WANtelligence?

Recently while working an RFQ project to re-mediate the WAN for a major health care practice management company,  we had the opportunity to listen to the major carriers describe their network solutions.   The client company was seeking a new partner to provide network connectivity options for their several major corporate locations, three data centers and over 600 remote office locations.   The company is growing expotentially and expected to double its WAN requirements and end points with in 12 months.  The network was to provide Internet, data, voice and video communications and as such,  the Service Level Agreements were to be consistent with those required to provide toll quality voice and full motion video.   Historically the company had used ipsec VPN tunnels over Direct Internet Access (DIA) facilities that ranged from bonded T1 to shared media broad band cable and occasionally free space transmission when terrestrial connections were impossible.  Each remote site also used Cradlepoint 4G for fail over and redundancy.

MPLS connectivity to rural America?

Not withstanding San Diego’s recent loss of the Chargers there are some 32 NFL cities in the United States.   Contracting for a high quality, high speed WAN solution in any of these cities is really not a challenge, most any carrier can help you.   The real challenge is getting the same connectivity  to Margaretville, New York or East College Station, Texas.   If you are searching for an MPLS connection to a branch office in a rural American area and you will find that it is rubric cube of challenges!  No one carrier has a foot print that will cover all your requirements and if you are looking for “one neck to choke” when things go black,  you may be giving up network visibility to  facilitate easy order entry and administration.   Work with an aggregator and you will most definitely lose your visibility to the underlying carriers who together knitted your WAN solution.

(Using our super secret online carrier database, www.buildinglit.com , we attempted to check out broadband connectivity to Margretville New York,  just for kicks to prove a point.  Click here for results.)

We listened attentively as Metel,  AT&T, L3, Century Link and Earthlink stepped up to the podium and delivered their very best solutions.   In all but one case, each carrier presented an MPLS solution.   All carriers mentioned SDN, but only one carrier led with that solution and recommended it as the solution for this client opportunity.   Most of the presentations began to sound the same, each carrier was the absolute  best in the marketplace,  each had the widest foot print, with outstanding customer service and the best proven technology!

What is SDN anyway?

Most folks can remember way back in 2007 when Steve Jobs introduced the device that would not only change Apple, but redefine mobile communications forever.  Jobs had given AT&T the exclusive right to provide network connectivity for the new device.  It was something of a “bet your company” play for both Apple and AT&T.   When the iPhone App Store came online, after Jobs opened the iPhone to developers,  the demand for bandwidth exploded and the AT&T network all but collapsed under the weight of all the new devices.  AT&T had to act quickly, faster than building new network capacity would allow.   The solution was to apply software in a way that network capacity would be effectively increased while physical plant was being deployed.   AT&T pioneered software-enabled networking!

For those not familiar with the concept of Software Defined Networks, or what we call WANtelligence, think of two roads connecting a location across a river to a main highway on the other side.   One road might be a more direct path, but not well paved.   The other road might be well paved but not very direct, with more of a circuitous route that added miles to the  distance of the direct path (i.e. Latency).   From time to time, the roads might be backed up with traffic, slowing or stopping your efforts to get to the main highway (i.e. Jitter).  A software defined solution works something like the popular mobile app Waze or Google Maps.   As  you are traveling, the map sends updates and suggest alternative routes.   An SDN solution would not only inform you of conditions, but automatically just take the action of routing you over the best route!

At the Branch Office end point, SDN components require multiple connections to the main broadband highway.  Generally, this might be a broadband connection like MPLS in addition to a DIA link.    The onsite device, under control of a cloud based optimizer, does a packet by packet analysis of the best path solution.   Again, much the way your traffic app knows your originating location and destination,  the SDN knows source and destination and the status of the entire network options between and through central control, optimizes path selection.

There are many vendors of the equipment that might be located at your Branch Office, but they might not provide the total solution.    A complete SDN requires that a centralized intelligence, typically a cloud based portal, be aware of the network and all other end points on that network.   Some devices can also include functions that might otherwise require separate devices.  For example, Firewall, Intrusion Detection, Network Optimization, Compression and Encryption in addition to the flow control and VRF functions that make up the elements of Software Defined Networks.   We found a Gartner Summary that is worth a review and includes a summary of many of the vendors in this exploding market segment.  We note that VeloCloud, a CISCO investment, seems to have it all and is establishing a defensible market share and leadership position.    VersaNetworks seems to be a component play and both companies have been included in proof of concept offerings by major carriers.   You can also download the white paper “Delivering Managed Services” from the DrVoIP site along with other free white papers on related subjects!

WANtelligence Summary

Software defined networks are in fact a reality and are rapidly becoming a cost effective solution that can assure high quality voice and video communications across the WAN.   We continue to work with this technology and have hands on experience with both products and services.   WANtelligence is our agnostic approach to developing Software Defined Networks!  Our Certified Network Architects add expertise and expereince to your enterprise when considering how to include SDN in your network plan!   Give us a call, or write DrVoIP@DrVoIP.com and we will share what we know!

Update note –

Cisco closes on $610M Viptela purchase

|About: Cisco Systems, Inc. (CSCO)|

Cisco Systems (NASDAQ:CSCO) has wrapped its acquisition of privately held Viptela.

Cisco had come to a $610M (and assumed equity) deal to acquire the software-defined wide area networking company in May.

Viptela will join the Enterprise Routing team inside Cisco’s Networking and Security business under senior VP DAvid Goeckeler.

Shares are up 0.8% premarket.


What Carrier can provide Fiber to my branch office?

What Carrier do I use for this location?

If are responsible for planning out a WAN connectivity solution for your VoIP deployment, you need to know what carrier services your target circuit location. This can lead to the most frustrating experiences an engineer can have! You actually have to rely on someone else to provide information so you can finish your work! Even a simple point to point VPN tunnel requires you to figure out what carrier options are available at your target location. How do you do that? Start calling a list of carriers and asking the first line call center sales folks if they can provide an internet circuit to your branch office in Syracuse, New York? You do a google search and you end up with a list of possible candidates and then you start your outbound calling! Maybe you have a friend who is a sales rep for a circuit aggregator, so you try that option.

The secret Carrier database!

What if you could go to a website, you don’t even need to talk with a sales person, you just plug in an address and Viol! A list of all the Carriers that can service that location magically appears! X marks the spot of every Fiber drop that carrier has in the specified distance from your target address. Not just the carrier your aggregator wants to show you, but all the carriers that can service that target location. You even get a Google map street photo of the location! What if you could just click on that magic X and get a quote! Now that is freaking awesome!

We have been working on a very large WAN deployment to a ShoreTel system that has over 500 branch offices! Now try and knit together that circuit map without a database resource that you can directly tap. We discovered a website that makes the process as simple as entering a location address. Blow out your candle Pilgrim you search has ended, just click here  enter a Street location and you you will get a list of carrier solutions.

buildinglit.com

The good folks at BuildingIT have made finding WAN solutions as simple as locating an Uber Driver!    You don’t have to talk to a sales person, but if you do, they have some of the smartest circuit folks in the industry.  Can’t find fiber for  your Laramie WO location, ask sales to quote a solution through the website and they will come back with any number of alternative solutions, priced and ready for the next phase of your deployment, installation.   They even offer  bundled project management so you don’t have to worry the deploy.  One throat to choke, one website to research and one solution that makes a lot of sense to us!


ShoreTel SIP Trunk Configuration – Version 14 update Part 1

Our older posts on this subject are getting a bit dated and an update is long over due.   ShoreTel has been using a version of SIP since day one.  We say a version of SIP because at the formation of ShoreTel, SIP standards had not yet been solidified.   ShoreTel SIP, therefor, was not interoperable nor did it need to be.   Our fist experience with ShoreTel was Version 3.1  back in 2001!    At that time, ShoreTel did not yet support IP phones, but ShoreTel SIP was and continues to be the call setup protocol used between ShoreGear switches.

Though ShoreTel introduced IP Phones in Version 4 with the private labeling of Polycom handsets, ShoreTel SIP for desktop devices did not become available until Version 8.   This early version of the SIP protocol required you to configure the first version of the IP8000 as a SIP trunk not a SIP Extension.  It was a step in the right direction, but it was not until V13 that we got a version that was more compatible with other SIP devices and not until Version 14 before we reached PRI parity on SIP trunks with the introduction of media termination points.

SIP in general is relatively simple to configure and mirrors most of the steps you take to implement a normal TDM Trunk Group.   The devil, however is in the details!  IP profiles, NAT, firewall, Digest Authentication and Carrier particulars need to be mapped out.   Generally, a Session Border Controller is a best practice for a SIP deployment.  Where does your network end and the carrier network begin?  Well, that is the single most important benefit of a SBC!  Additionally, the SBC can be the point at which we “normalize” SIP messages and translate between any dialectic differences between SIP implementations.

Generally, in ShoreTel you will setup your underlying resources by allocating ShoreGear switch ports, media  termination points, profiles, timers and DTMF handling configurations.  The  Creation of a SIP trunk group is very similar to the configuration of a PRI trunk group and the same options will need to be specified as to the use of this group.   Then SIP trunks are added to the SIP trunk group, the actual circuits on which phone calls will take place.   If the trunk group is to support tandem trunking and is connecting to another system as a tie line, the off premise extensions and digit translation options will also need to be configured.

The first video will walk through the configuration of a TIE trunk between two ShoreTel systems.  One system will use the TIE trunk to place all outbound PSTN phone calls through the other ShoreTel system.  Both systems will use the Trunk Group for extension to extension calling, with one system having extensions in the range of 200-299 and the other having extension in the 300-399 range.   We will walk through the basic configuration and then also take a look at wireshark captures to illustrate the SIP call setup message exchange.    In the second part of this update, we will the route calls out a SIP trunk to a SIP carrier for PSTN calls, using several different SBC’s.

Contact DrVoIP@DrVoIP.com to have us setup this up for you!  We offer flat rate configurations!


ShoreTel fail over options using Vmware – Part 3 the “HA” and “FT” Option!

A quick review of vocabulary before we go into this subject any further.    First when we refer to vSphere, we are talking about the entire VMware ecosystem and all of its components.   It is just a short hand for the entire system solution.    ESXi is a VMware hypervisor.  It is the “host” hardware on which the “guest” virtual machines run on.  vCenter is an administrative portal that enables you to manage multiple Datacenters.   A Datacenter is a collection of ESXi hosts.  I strongly urge all serious engineers to watch Kieth Barker’s presentation in CBTnuggets on this subject, particularly his presentation on HA and FT in the certification training for vSphere VCP5-DCV.  Kieth is a truly excellent instructor and he gets paid to make videos!

A more advanced ( read cost more money) strategy for managing server failures in vSphere is either High Availability or Fault Tolerance.    Assuming we have three ESXi hosts, lets take a quick look at how each of these strategies would work.   Using vCenter we would enable High Availability or HQ at the cluster level.  The first ESXi host to boot up, would be nominated Master. Assume the ShoreTel HQ is a virtual server running on this ESXi(1).  All the ESXi hosts in the cluster, would exchange heart beats over the management LAN that they all share.   Should the heart beat from ESXi(1) not be detected, it would be considered down and the virtual machine would be restarted on the secondary server in that cluster.

An VMware server running VMware Tools, can also generate heart beats between itself and the ESXi host that it is running on.   Should the host not receive a hear beat from the guest VMware server, it would consider it down and cause a new instanc of that VM to run.   Generally, it is a good practice to use a backup hearbeat to verify the failure of a machine.  For example, if the host machine does not generate a heart beat detected by the other hosts in the cluster a back up check could be made to see if the iSCSI storage is being accessed by the missing VMware server.  If that heart beat is detected, then the guest is not considered down, but is consider “isolated” and the new instance will not be started.

The issue with High Availability is how long does it take to bring up the replacement guest machine on a new ESXi host?   What is the boot time?   In Part 2 of this discussion we talked about a configuration that could survive this issue if it was the DVM that went down as the HQ would take over during the down time.  If this was implemented in vSphere with HA, the entire process would be transparent to users.

Fault Tolerance is the solution when there can be no down time whatever  should the HQ server fail.    FT is activated through vCenter as easily as HA, but generates a “mirror” image host that is always running.    For example, a ShoreTel HQ server running as primary on ESXi(1) might have a “mirror” host running as a secondary on ESXi(2).   Should the primary ShoreTel HQ host fail, within microseconds the ShoreTel HQ mirror or secondary will take over.  Not only will it take over as primary, but a new secondary mirror could be started on ESXi(3)!

Clearly FT is the way to go if you feel you can not survive a ShoreTel HQ loss under any condition.  Understand that it is resource intensive, as you are minimally running twice the horsepower!  Also to keep the “mirror” images alike, you will need a high bandwidth connection between ESXi hosts to provide for “FT Logging” which is all the activity to copy real time between hosts.

As previously mentioned, a copy of VMware vSphere Essentials Kit which includes ESXi for a total of 6 processors or 3 severs with 2 processors each and a copy of vCenter along with updates for 1 year is about $560.  vSphere Essentials Enterprise Plus which adds in the functionality of vSphere Hypervisor, vMotion, Cross Switch vMotion, High Availability, Fault Tolerance, Data Protection, vShield Endpoint, vSphere Replication is $4229.   Support on all products can be purchase as needed or for term.

Out next project is to figure out how to do this all on Amazon Web Services and at what price!

The video shows key elements of this discussion!


ShoreTel fail over options using VMware – Part 2 the “Poor Man” Option!

A simple yet very effective step you can take to assure a high availability  is all but free!  It occurs to us that it is no longer acceptable to install ShoreTel on anything other than a VMware ESXi server!  Lets face it, you have to purchase a hardware package to host your server regardless of which way you go.   You have to purchase a copy of Microsoft Server, regardless of which way you go.  So how do we make this more cost effective?   From our perspective upgrade the hardware platform you have to purchase anyway,  to be a quad core with about 16 -32 GB of memory.  ESXi is still available for free, so download and install it on that platform then install the Microsoft Server on top of it!

Now you have your ShoreTel HQ server at the HQ site.  No harm no foul and you are positioned to do some really kool things.  First, clone the Microsoft Server and bring it up as a DVM.  The key here is to install the DVM at the same level as the HQ server, not below it as a child server.  Put you HQ users on this server and have this server manage all your HQ site ShoreGear switches.   The reason for this is, it is the cheapest most cost effect fail over you can provide.  ShoreTel servers fail up, OR across but not down. This means if the DVM fails, the HQ server will proxy for it for those users!  Forget all that Double Take Double Talk!  Just do it.

While you are at it, bring up a virtual ShoreGear User switch as a “spare” switch and also install the vConference switch. The spare switch enables you to spin up an alternative switch for any site, if a switch at a site goes down.  No cost to you unless you don’t fail bak in under 45 days! Why would you not do that?  Why would you work with a partner who did not just do this as a “best practice”.   Come on guys, this is like deployment 101,  just do it.  The freaking conference server is “free” as an IM solution and the licenses for the conference bridge and desktop sharing users is cost effective when compared to anything in the market including GoTomeeting and Webex!   Again, what is there to think about?

So now you have your VMware platform offering a HQ server, a fail over DVM server, User Switch and an IM server.   Consider that for the cost of a Microsoft Server (you saved that by cloning one, remember) you can purchase (hoepfully from us)  a copy of vmware Essentials.  This package adds vCenter to the mix and now you are kicking it.    vCenter sets up a centralized administration interface for your ESXi servers.  You can now setup heartbeats between the ESXi host and the VM machines as long as they are running VMware tools.   You can also run heartbeats between vCenter and the ESXi hosts so that on failure of a heartbeat, vCenter launches another instance of whatever serer went down on another cluster host!

Are you freaking kidding me?

The video shows you how to install the DVM at the same level as the HQ server and how to clone a virtual machine.  Subsequent videos will explore the high availability and Fault Tolerant options available with vCenter and clustered ESXi hosts.


A ShoreTel Communicator for the Mac?

We recently had an opportunity to work with a ShoreTel client that was exclusively using Apple Mac’s throughout their enterprise.   We asked how they made that decision given the clear cost advantage WinTel PC hardware had over your basic Macbook.   The answer was simple and clearly economic.   They had used Windows in the past, but found that they had to many problems with virus, email, drivers and the annual cost of license renewals! Yes the Mac’s cost more but they just seem to work and they don’t have to worry license issues.    Interesting.

This was a ShoreTel deployment so that made for some interesting trade offs when it got down to the desktop software.   The ShoreTel Communicator is optimized for the Windows based machines.    There are several license types for Personal, Professional, Workgroup Agent, Workgroup Supervisor and Operator Communicators.   With the Mac, there is only one Communicator and it has the functionality of the ShoreTel Web Communicator which is basically a Personal Communicator.

It does however get the job done as far as call handling modes, inbound primary phone options, multiple call management and visual voice mail.  You can setup your call handling modes including your personal operator and find me functions for each mode.  You can configure and select 5 alternative phones and setup your incoming call routing to include simultaneous ringing of other phones.   The visual voice mail tab works just like you would expect and you can also select a history and call details tab.

The noticeable difference is the absence of IM options.  ShoreTel had been suggesting the use of iChat for that function as that client was supported on the ShoreTel SA-100/400 conference servers.   In the Communicator there is always more than one way to do something: point and click, right click, use some chord sequence on the keyboard that includes the control key.   Right clicking on a Mac Communicator however is not going to work!  There is however, drop down menu options that appear as required to assist your call management.   All in all, the Mac client is an excellent solution if you have a Mac and a ShoreTel.  You can download the MAC dmg installation file from the ShoreTel HQ server and you are good to go!