[breadcrumb]
 This pre-configuration and population of basic and default parameters is done for a reason that also helps explain why you cannot delete anything after you create it! Assume you open a new Amazon Connect instance and following the setup menu, add a telephone number. Assign that number in the drop down window in the phone number configuration to point to the “Sample inbound flow (first call experience”. Then call the number. This Call flow will make use of most if not all of the default and sample contact flow listed in a fresh out of the box, unmodified Contact instance. Since we did not configure an agent or queue it draws on several preconfigured parameters including the “Default Customer Queue” which describes what a caller hears while waiting for an Agent to become available and the “Basic Queue” along with the “Basic Hours”.

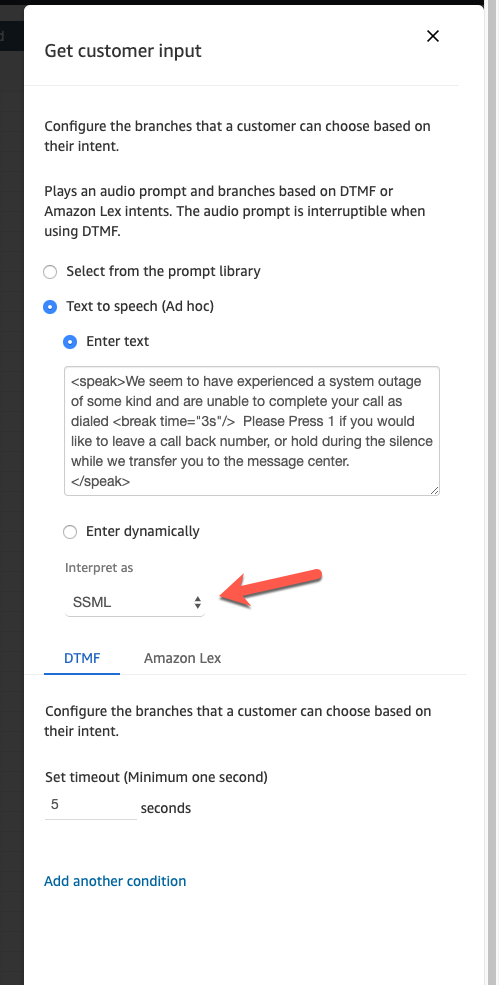 As a consultant deploying call center and IVR solutions, one of the most frustrating aspects of the implementation is waiting for clients to get their voice prompts together! Generally we will not start an implementation until we have the prompts! Text to Speech is a life saver for deployment engineers. You can create prompts on the fly and let people test them, suggest modifications and really fine tune the prompts to achieve the desired level of customer care. When the prompts are all agreed to, you can then get them professionally voiced or not! We find that Amazon Polly is an excellent option for prompts but we also suggest that you use the Speech Synthesis Markup Language option. In all of the prompt areas you can choose between loading a Wave file, or using Text to Speech. When using Text to Speech you have the option of interpreting the text as text or as SSML. SSML enables you to add tags that can control the various components of speech including tone, pitch, speed and format. You may want a number read as a phone number for example, rather than a long integer. SSML is simple to configure and it very powerful. Learn to use it always and you will have very excellent results.
 Now that you have the Contact ID you can move over to CloudWatch (this assumes you have enabled logging) and you can search for this ContactId record and follow the entire call flow from start to finish, Go to the CloudWatch service, click on Logs and then locate the "Log group" for your Amazon Connect Instance. This will pop a list of "Log streams" and "last event time". Find a row that closely matches the date and time of your target ContactID and open that log stream by clicking on it.
Note that the time in the even stream is in UTC and matching log times is always interesting. In this example we searched for a particular Contact ID in the Connect dashboard and it shows that the call we are interested in had a "Initiation TimeStamp" of *7:46 PM" GMT/UTC or Zulu time (if you are military, which all mean the same time reference regardless of where you are located on the globe).
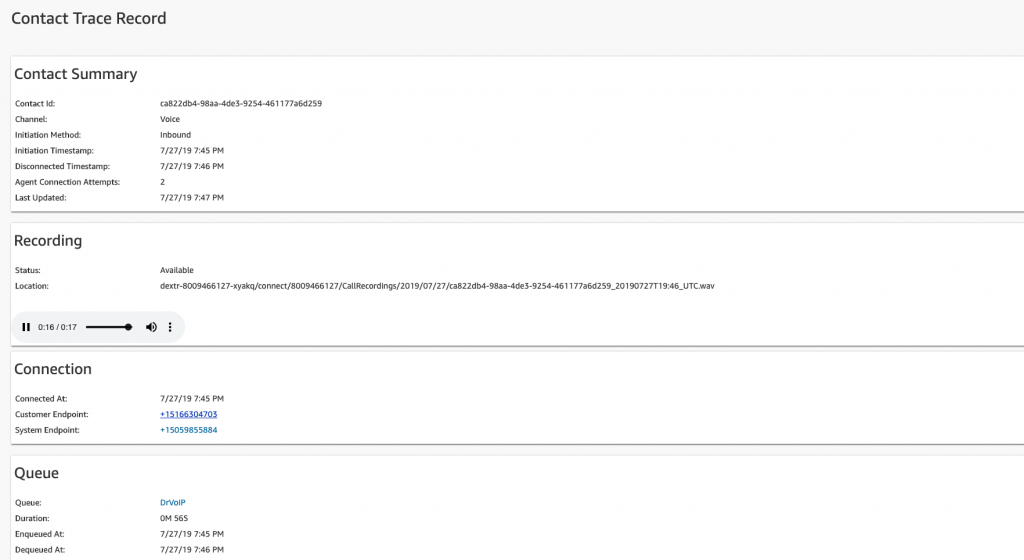
 The Contact ID is a clickable link, and will bring up some information of interest as contained in the Contact Trace Record. There will be a Contact Summary, A recording if enabled with the location of the recording and a playback button, Connection Endpoint pairing and Queue information.
 Heading over to CloudWatch and checking the respective Log Stream in the instance log group, we find that the time is being adjusted to the GMT offset of the time zone the Instance time reference, which in our case is GMT -7 hours! S o the Contact Filter Search in the Amazon Connect dashboard is being Time Stamped for GMT/UTC but the log is offset (Terminate at 7:46 PM in dashboard is listed at 12:48 in the CloudWatch logs). Keeping track of this time offset will drive you a bit nuts, but if you are aware of it, you can figure it out. SUMMARY - Look in Cloudwatch for the UTC offset in your Connect Instance and NOT the time stamped in the Contact Filter of your Amazon Connect dashboard!
 When searching for records in the CloudWatch logs you will note that you can set it for ROWS or TEXT and you can also select to search by specific times and choose between UTC time or Local Time zone>
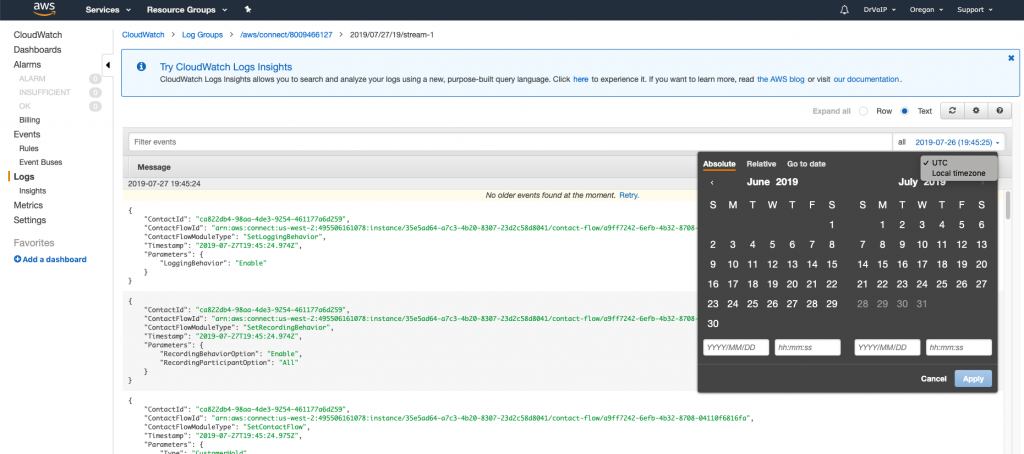 When you set your search by ROW you will get an orderly list of multiple Contact ID's within the event range reported. Logs are posted about every minute or so. In an instance with a heavy call flow you are going to find many different Contact ID's in that event range and will have to search for a specific record using a search filter in the format of "ContactId" = "ca822db4-98aa-4de3-9254-461177a6d259". In Text mode you can also search using the CTRL F feature of your browser.
When you use the ROW mode you will get a list of Contact Flow steps that, by pushing the down arrow will open each step for inspection. This is necessary to see each step of your call flow, what Contact FlowId was used by ARN.
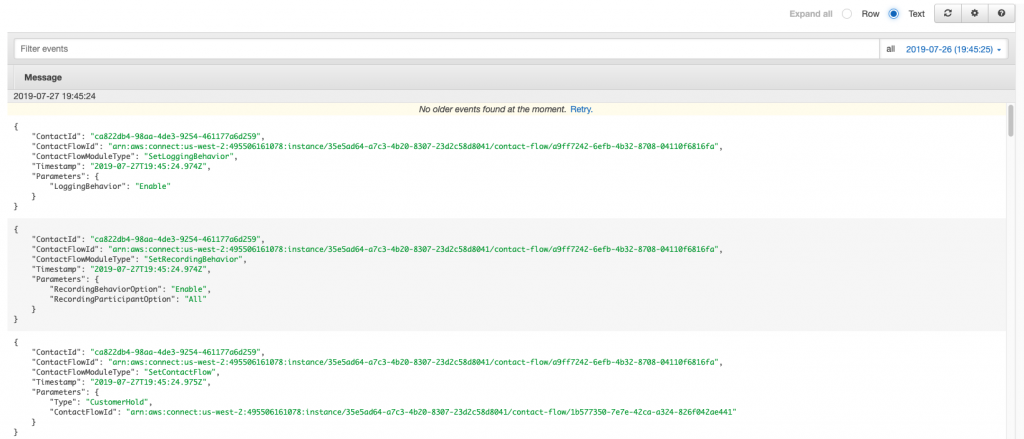
 Selecting the TEXT mode will generate the same list of JSON objects but they will be fully expanded:

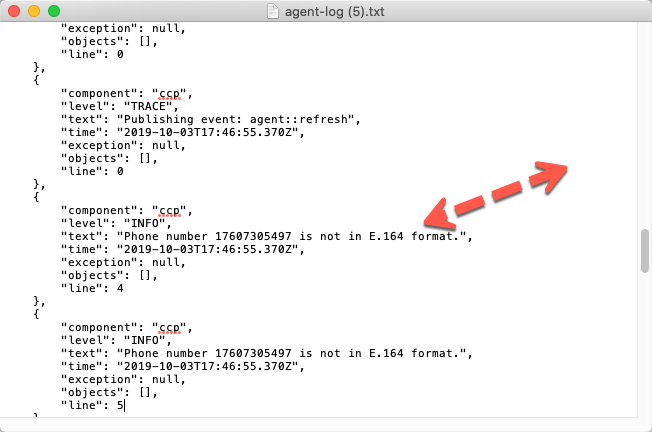
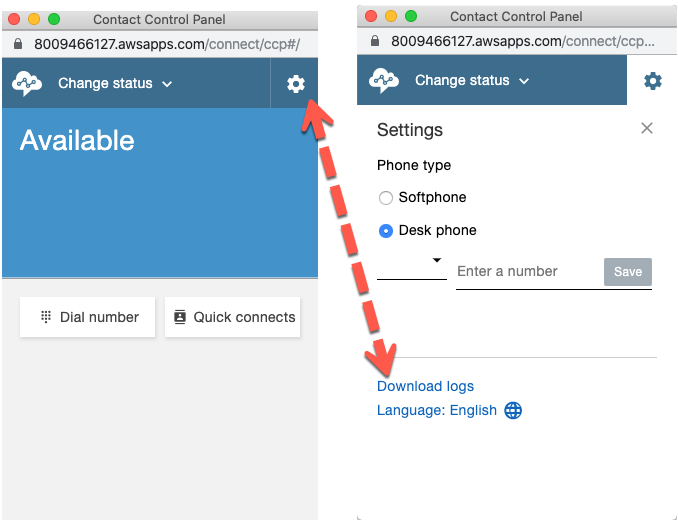 You can open the logs with any text editor and the content often spells out the issue pronto quick!
 (to be continued)
What no Delete for Contact Flows?
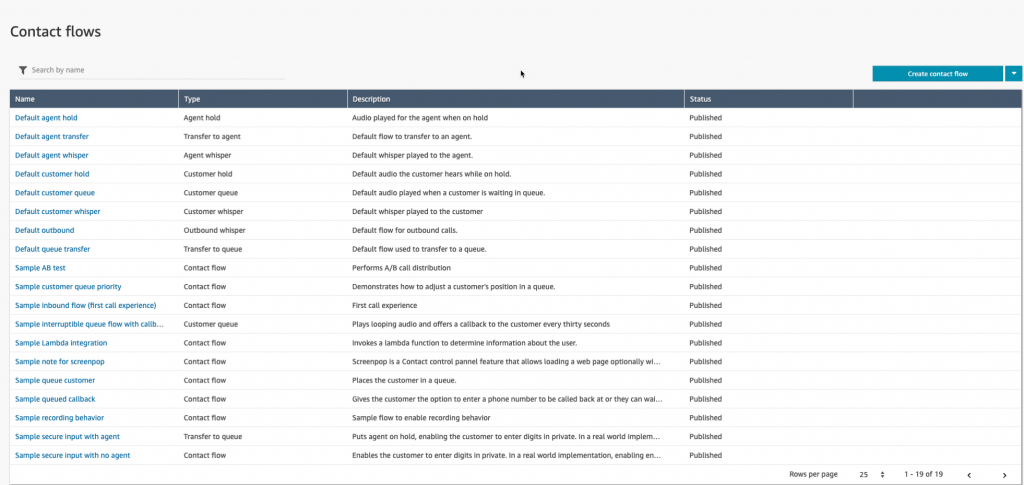
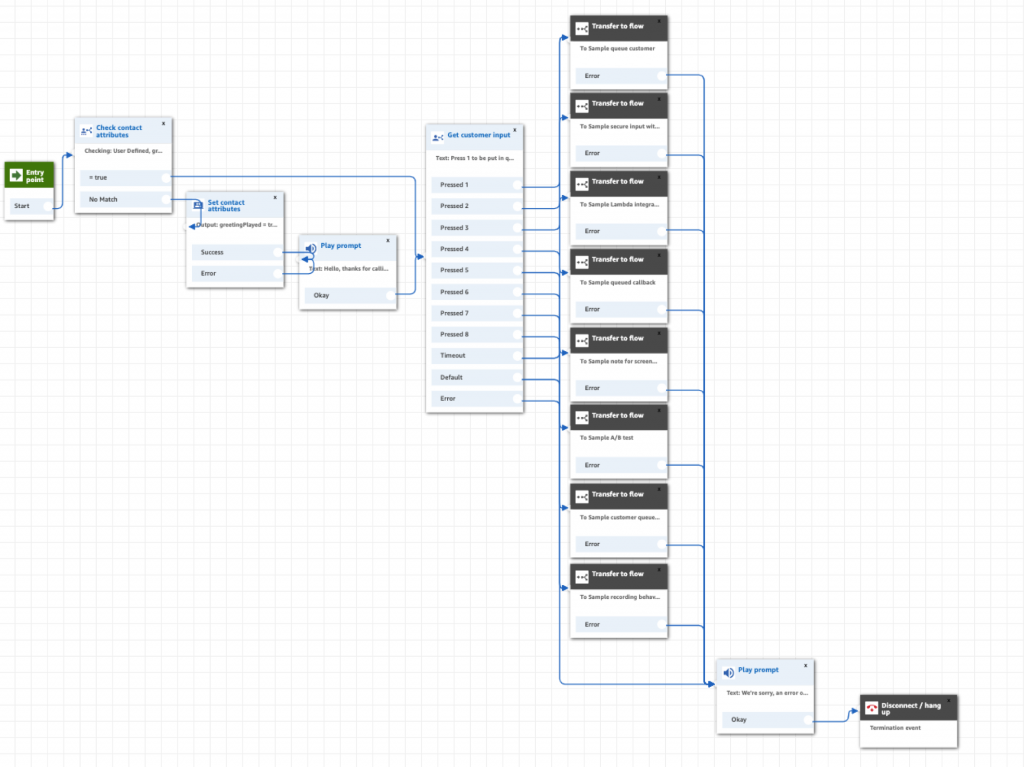
One of the first discoveries you will make while configuring contact flows is that you can NOT delete a contact flow. Once it is created, you can "save as" but you cannot delete it. There is a good reason for this and hopefully by the end of this blog it will make sense to you. Out of the Box, Amazon Connect comes pre-configured with a wide variety of contact flows and system parameters. You will see this listed as sample and default in a newly created instance. If you poke around you will also see that a schedule of basic hours has been configured along with a basic queue. There are preconfigured security profiles and preconfigured routing profiles along with a small library of professionally recorded voice and music prompts. This pre-configuration and population of basic and default parameters is done for a reason that also helps explain why you cannot delete anything after you create it! Assume you open a new Amazon Connect instance and following the setup menu, add a telephone number. Assign that number in the drop down window in the phone number configuration to point to the “Sample inbound flow (first call experience”. Then call the number. This Call flow will make use of most if not all of the default and sample contact flow listed in a fresh out of the box, unmodified Contact instance. Since we did not configure an agent or queue it draws on several preconfigured parameters including the “Default Customer Queue” which describes what a caller hears while waiting for an Agent to become available and the “Basic Queue” along with the “Basic Hours”.
How Amazon Connect stages Default Contact Flows
If you open the “Sample inbound flow (first customer experience)” note that it does NOT make use the “Default customer queue” step. How is that we hear it if it is not in the contact flow? When the call is transferred to an Agent we did not even configure yet (we are logged in as the Instance Administrator on a CCP softphone), we even hear the “Default agent whisper”. Nor did we configure a Queue? Likewise if we put the caller on hold we are tapping the “Default customer hold” contact flow. If we are in Call Wrap up, the caller would be hearing the “Default customer queue” contact flow while awaiting for an agent to become available. This is the key reason you can not delete anything! To do so would jeopardize the stability of the Connect Instance. These defaults assure that configuration newbies cannot stray materially from the experience they intended to configure. While the Connect instance is setting up an outbound connection to the agent CCP softphone, and even longer if dialing an agent’s hard phone. The caller will hear the “Default customer queue” experience. We recommend that you get a “ring back” audio prompt and use that in either the default customer queue or the customer queue you create. We think it is a bit confusing for a caller to call in and hear music while being transferred. You should also note the possible impact on your inbound call statistics. Additionally, note that billing started the moment your caller hit the phone number regardless of the fact that they are not yet connected to an agent.
Creating and Modifying Contact Flows using “Save As”
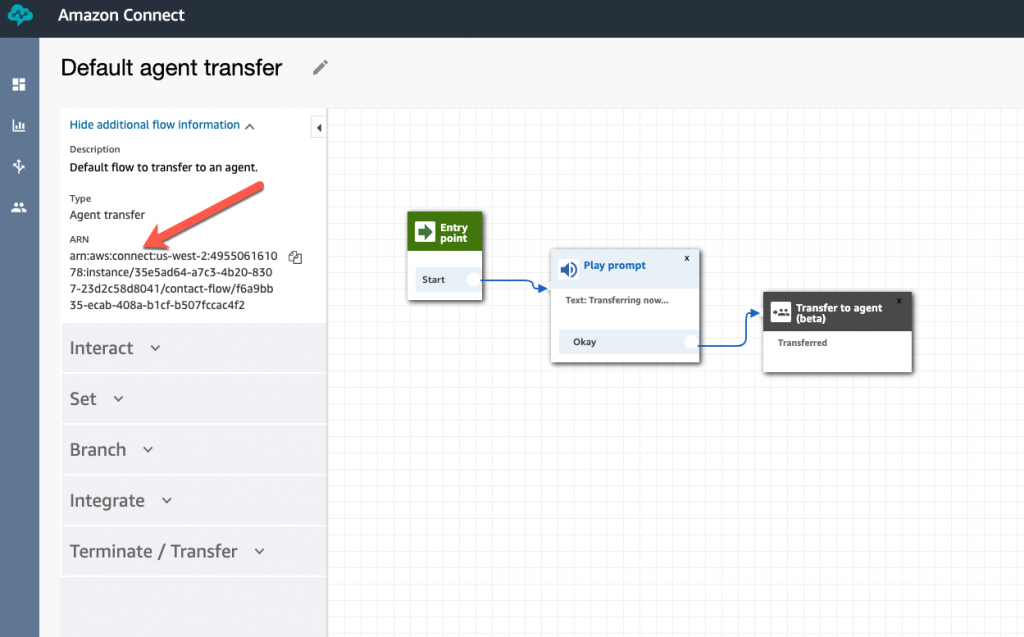
Each of the Contact flows in an Amazon Connect instance has an Amazon Resource Number or ARN. This is a globally unique identification number and defines every contact flow in the instance. Generally, you will build a new contact flow from an existing one. To do this, you first open the contact flow you want to copy and do a save as. You have to pay attention here, or you will have a big problem! Some folks open a contact flow, change the name and make some modifications and then publish it! It will show up in your list of contact flows, but it will still have the ARN of the original contact flow even though you renamed it! This means that other contact flows that call on that original contact flow will now get all your changes! What you want to do is rename the contact flow and do a "save as" in this way you create a new ARN and will not be over writing the original contact flow.
Not all Contact flows have all contact flow Options?
There are about 9 different types of contact flows that you can create to meet your call flow requirements. If you create a new Contact Flow you need to understand that not all contact flow types will have all the contact flow options. For example if you are describing the experience you want a customer to have while in queue waiting for an agent to become available, you will open the "Default Customer Queue " and do a "save as" to create your experience. Do not expect to find a "Transfer to Flow" option in the list of possible steps as that option is not available in this type of contact flow. The list of step options changes based on the type of contact flow you are creating, so keep this in mind!
Error Handling
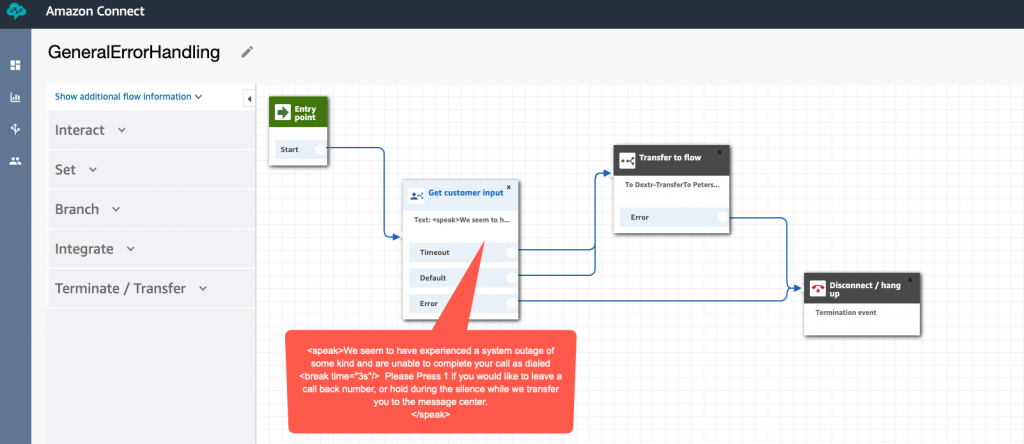
Generally, every step in a Contact Flow has an error exit. We have found that it is best to create a Contact Flow named "error handling" and to use this as the solution to all of the options that you must provide an error exit.
Use Speech Markup Language for Text to Speech prompts!
 As a consultant deploying call center and IVR solutions, one of the most frustrating aspects of the implementation is waiting for clients to get their voice prompts together! Generally we will not start an implementation until we have the prompts! Text to Speech is a life saver for deployment engineers. You can create prompts on the fly and let people test them, suggest modifications and really fine tune the prompts to achieve the desired level of customer care. When the prompts are all agreed to, you can then get them professionally voiced or not! We find that Amazon Polly is an excellent option for prompts but we also suggest that you use the Speech Synthesis Markup Language option. In all of the prompt areas you can choose between loading a Wave file, or using Text to Speech. When using Text to Speech you have the option of interpreting the text as text or as SSML. SSML enables you to add tags that can control the various components of speech including tone, pitch, speed and format. You may want a number read as a phone number for example, rather than a long integer. SSML is simple to configure and it very powerful. Learn to use it always and you will have very excellent results.
Don't forget to assign outbound phone numbers to your Queues
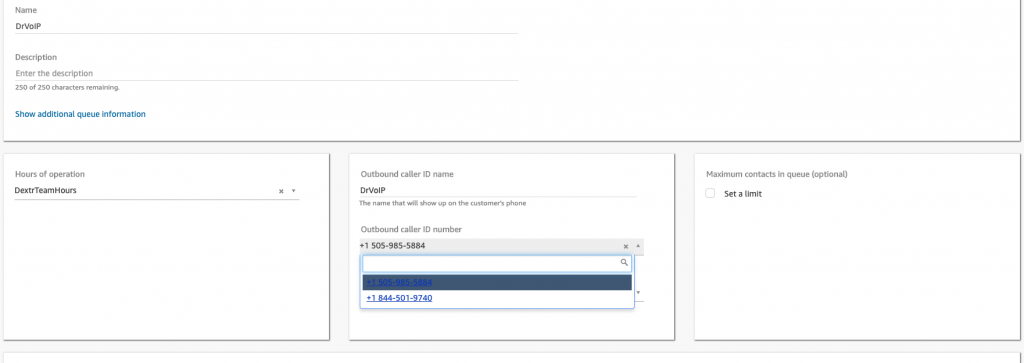
In Queues in which Agents are expected to make out bound calls you must associate a phone number to that queue for outbound dialing. The Agent will not be allowed to make outbound calls if they do not have a phone number assigned to the queue. You can also try to put an outbound name in the same configuration area, but there is no guarantee that this name will be displayed to the CallED party. The phone number will most likely display to the CallED party, however names are provided by multiple options at both the carrier level and the end device level.
Trouble Shooting 101
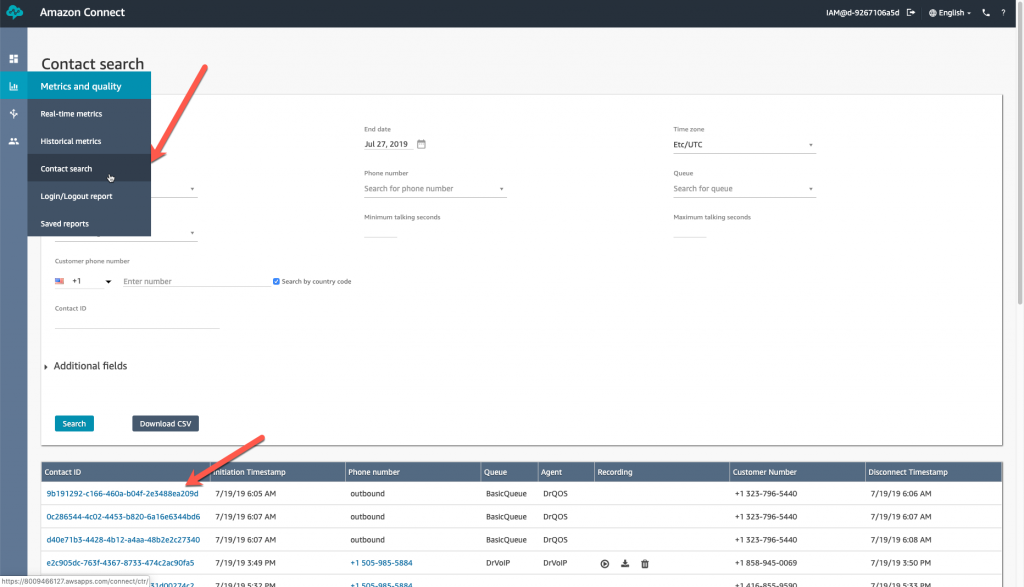
When trouble shooting Amazon Connect contact flows your best friend is CloudWatch and Contact Flow Filters! Lets take a look at each of these tools to better understand how they work together to provide a history of how a specific call behaves. First while in the Connect dashboard you will find under "Metrics and Quality" you will find a TAB for "Contact Search" . Selecting this option will enable you to set search filters for the contact record you are trouble shooting. You can filter on the usual date and time parameters, but also by queue, and by call type and direction (Inbound, Outbound, Transfer, API, Call Back and Queue Transfer). The goal is to obtain the "ContactId" the key to all activity in the Connect Instance. If you know this ContactId you can just search for it and skip the filters. Optionally you can just "Search" and you will see a list of ContactId' based on the default filter. Now that you have the Contact ID you can move over to CloudWatch (this assumes you have enabled logging) and you can search for this ContactId record and follow the entire call flow from start to finish, Go to the CloudWatch service, click on Logs and then locate the "Log group" for your Amazon Connect Instance. This will pop a list of "Log streams" and "last event time". Find a row that closely matches the date and time of your target ContactID and open that log stream by clicking on it.
Note that the time in the even stream is in UTC and matching log times is always interesting. In this example we searched for a particular Contact ID in the Connect dashboard and it shows that the call we are interested in had a "Initiation TimeStamp" of *7:46 PM" GMT/UTC or Zulu time (if you are military, which all mean the same time reference regardless of where you are located on the globe).
 The Contact ID is a clickable link, and will bring up some information of interest as contained in the Contact Trace Record. There will be a Contact Summary, A recording if enabled with the location of the recording and a playback button, Connection Endpoint pairing and Queue information.
 Heading over to CloudWatch and checking the respective Log Stream in the instance log group, we find that the time is being adjusted to the GMT offset of the time zone the Instance time reference, which in our case is GMT -7 hours! S o the Contact Filter Search in the Amazon Connect dashboard is being Time Stamped for GMT/UTC but the log is offset (Terminate at 7:46 PM in dashboard is listed at 12:48 in the CloudWatch logs). Keeping track of this time offset will drive you a bit nuts, but if you are aware of it, you can figure it out. SUMMARY - Look in Cloudwatch for the UTC offset in your Connect Instance and NOT the time stamped in the Contact Filter of your Amazon Connect dashboard!
 When searching for records in the CloudWatch logs you will note that you can set it for ROWS or TEXT and you can also select to search by specific times and choose between UTC time or Local Time zone>
 When you set your search by ROW you will get an orderly list of multiple Contact ID's within the event range reported. Logs are posted about every minute or so. In an instance with a heavy call flow you are going to find many different Contact ID's in that event range and will have to search for a specific record using a search filter in the format of "ContactId" = "ca822db4-98aa-4de3-9254-461177a6d259". In Text mode you can also search using the CTRL F feature of your browser.
When you use the ROW mode you will get a list of Contact Flow steps that, by pushing the down arrow will open each step for inspection. This is necessary to see each step of your call flow, what Contact FlowId was used by ARN.
 Selecting the TEXT mode will generate the same list of JSON objects but they will be fully expanded:

CCP Trouble Shooting
There is a very useful tool for testing the connectivity of a specific desktop call control (CCP) to your Amazon Connect instance. It provides useful information about the latency, resource, reachability and connectivity that are essential base lines for trouble shooting. Click here!
CCP LOGS
On the CCP you will find the little GEAR symbol and if you click on that you will be able to download the logs for this Agent Desktop. You can open the logs with any text editor and the content often spells out the issue pronto quick!
 (to be continued)