An IP Blue soft-phone tool kit for serious CISCO voice engineers!

The trials of a Call Center Engineer!

As a consulting engineers, we spend a lot of time working remotely over a VPN connection!  Testing configurations, features and CSS access requires end points!  Typically more than one end point device!   Scripting for the call center applications is even more demanding as you need to be able to test call flows.  Now a VPN over CISCO Anyconnect that allows you to work long hours remote is always nice, is not the same as a point to point VPN.  You might get one IP Communicator up on your local machine, but it is often not practical to register multiple devices.  When testing a UCCX scripts you need multiple Agent and Supervisor Phones to really ring out (pun intended) your call flow.  How best to do this?

Enter IP Blue!

I was taking a CISCO certification class and noticed that the instructor somehow managed to get multiple IP communicators up on his desktop.  I immediately realized the value this would have for UCCX scripting in particular and CISCO CUCM work in general.  I did a bit of research and found a company named IP BLUE Software Solutions, the industry’s best kept secret!  They make some really innovative products, but the one that I now can not live without is the “VTGO-PC Multilab Softphone” a product without equal and one that is a must have for every serious CISCO VoIP Engineer.   With this product I can open some 5-8 7960 type CISCO phones on my desktop, all registered to call manager with individual extension numbers and separate sound interfaces (i.e. speakerphones).   I used to have one IP Communicator and one X-lite SIP phone open on my desk and that was the best I was able to do remotely.  Now I can open an entire call center on my desk!  Astonishing!


Softphone Feature Set

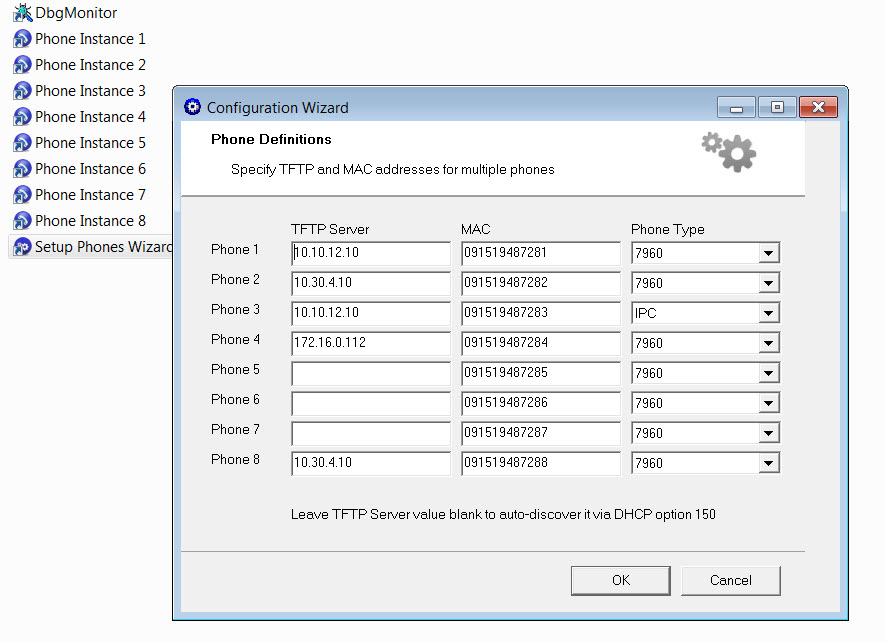
These softphones are fully featured CISCO 79XX models ranging from the 7960 through the 7975 and are completely configurable.   When working with multiple clients I can setup a phone for each system I remote into!  I can even right client on the Instance name and change it to a client name for future reference and quick setup when working on multiple simultaneous deployments! When working on a Call Center I can bring up a few agents, a supervisor and exercise the script for all the possible scenarios.  All on a single desktop!

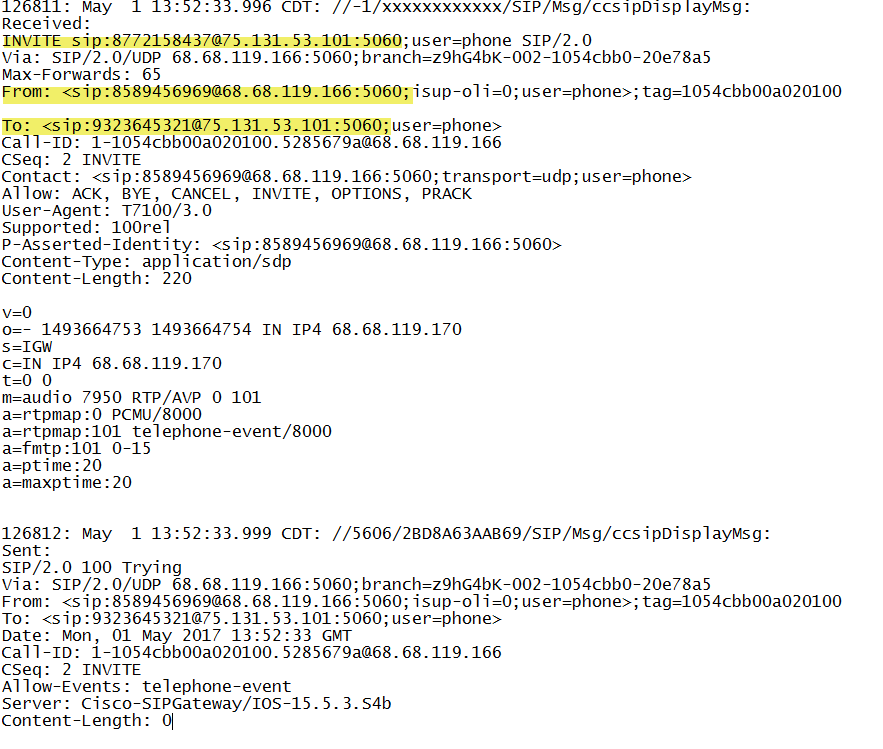
The feature set includes some really nice, not CISCO features, like an answering machine function!  Very Powerful! Multiple softphone instances can run on a single PC, connecting to the same or different Call Managers.  Each softphone instance is independent from another, and can call any phone including other softphone instances.  This setup allows to easily simulate various call scenarios, verify Call Manager settings, troubleshoot VoIP issues and configure Call Center Scripts results!   If you are running a  lab while preparing for some certification exam, this tool is going to not only save space and electricity, but lower the overall air conditioning requirements!  Here are some of the other features:

  • Emulates Cisco 79xx line of IP phones with dual 14 button expansion modules
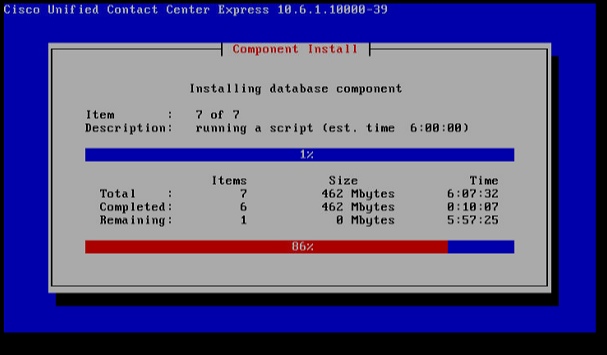
  • Tested and certified with CallManagers 3.2-4.1, CallManager Express
  • Supports Cisco Survival Remote Site Telephony, redundant CallManagers, DHCP option 150
  • High quality-low latency using multiple codecs (G.711, GSM 6.10, G.729), QoS support
  • Accessibility features for visually impaired users include text to speech and keyboard shortcuts
  • Supports Extension Mobility
  • XML telephony services
  • Configuration Wizard with user-definable profiles
  • Supports a wide range of external USB audio devices
  • STUN/UPnP NAT traversal, SKINNY fix-up protocol friendly
  • Call log with Callback
  • Call recording, storage and playback with email attachment
  • Integration with LDAP directories, MS Outlook, Windows Address Book, Instant Messengers (Microsoft, Yahoo, AOL)
  • Language Localization (English, Dutch, Danish)
  • Dialing from MS Outlook, Web pages and much more

This is the best kept secret in the industry and if you are a serious student or working engineer doing anything with the CISCO Collaboration suite, you need to own this software.  If you boss will not spend less than hourly rate he bills you out at, get it yourself!  The time you implementation and troubleshooting time you will save, will more than pay for itself in increase leisure and family time!    We rarely pitch products on this site, but this product was just so astonishing we had to share it with our readers!


CUBE SIP Header Matching – Extracting DNIS from a Toll Free Number!

The Problem – Call Forwarding DNIS to Toll Free Numbers

Recently we were presented with a new challenge while deploying a Call Center based on the CISCO UCCX Version 11.5 feature set. Generally, we employ DNIS as a strategy for defining the CSQ  service parameters.   The more specific you can make the inbound number, the less you will need to “prompt and collect” digits from your caller.   A call to a specific DNIS number can separate the English callers from the other language options, or route “customer service” differently than routing “technical support”.   DNIS is always a preferred routing strategy.    Using DNIS we can design a single call routing script that can  pull in the CSQ name; offer up the proper audio menu’s; provide unique queue handling options and customize the caller experience all based on the dialed number.

In this centralized scheduling application for a large national medical practice, patients would call a local number in their community.   This number was then forwarded by the carrier to a toll free number that rang into the centralized CISCO cluster and UCCX call center.   The issue was setting up the dial peers to address the number the caller dialed, not the toll free number.   These numbers terminated on a SIP trunk that was serviced by a CISCO CUBE and the number presented was the 10 digits of the toll free number.   The DNIS number, or the number that the caller originally dialed may or may not be buried in the TO field of the incoming SIP headers.

Solution – Step 1 Debug Captures of inbound SIP messages

We need to setup “debug ccsip messages” and “debug voice ccapi inout” and make some test calls.   We need to understand how the carrier is handling the forwarded number.    In the log output below we can see the INVITE is the 877 toll free number.   The number that the caller dialed is the 9323646969 number and we can see that it is in the TO filed of the sip message headers.   We will need to write a dial-peer,voice class uri,  translation rule and profile that extracts the TO field and routes on that number rather than the original INVITE.   It is the “voice class uri” that is most magical in this solution.   (Note that we got luck here and the carrier was handling the call forwarded number in a manner that was appropriate to our goals.   This however is not always the case)!


Solution Step 2 “Voice Class URI”

In this example, the caller is dialing 93236453XX which is being call forwarded to the  toll free 877 number and shows up in the sip headers in the TO field.   The solution here is to create a “voice class uri”  rule.  In the snippet below we can see “voice class uri 102 sip” with a “user-id of 9323645323” as an example.   We are going to ultimately want to translate this to a four digit extension number 5323 and this is done with the traditional translation rules.  In this example “voice translation rule 102” does this conversion.  Note however that the translation rule refers to a match on the 877 toll free number, not the  9323645323 number.  This is where the magic of  “voice class uri”, the ability to do dial-peer matching based on the uri.

The Voice Class uri is structured such that it has a unique TAG and then a matching expression or host IP address.   The the snippet below we can see two attemtps to setup up a uri filter based on the last digits in the TO field of the SIP header.  Tag 102 looks to match 5323 and tag 103 looks to match 5324:

Solution Step 3 Dial Peer Matching

The call flow is dictated by dial-peer matching.   From the following snippet:

dial-peer voice 103 voip
translation-profile incoming 5324
session protocol sipv2
incoming uri to 103
voice-class codec 1
voice-class sip bind control source-interface GigabitEthernet0/0/0
voice-class sip bind media source-interface GigabitEthernet0/0/0
dtmf-relay rtp-nte
no vad

!

dial-peer voice 102 voip
description Incoming – FAX DID
translation-profile incoming 5323
session protocol sipv2
incoming uri to 102
voice-class codec 1
voice-class sip bind control source-interface GigabitEthernet0/0/0
voice-class sip bind media source-interface GigabitEthernet0/0/0
dtmf-relay rtp-nte
no vad

We can see that the voice class reference is applied to the dial-peer much the way a voice translation-profile is applied with the expression “incoming uri to 102” which sets up a filter to match for the number  9323645323.  Note that the dial peer matches the voice class but it is the translation-profile incoming 5223 that changes the ten digit number of the URI to the desired four digit extension.  In fact if you study the voice-translation rule 102 rule 1, references the toll free number!

These tools, the voice-translation rule and the voice-class uri work together to enable us to route and match dial-peers on information in the uri and not necessarily the original INVITE sip: number! Way powerful!


TEXT-2-AGENT Sending text and pictures to your call center?

Can you send a picture to your ShoreTel or CISCO Call Center

We have been integrating SMS to CISCO UCCX and ShoreTel Call Center deployments for customer service scenarios for some time.  The interface is very simple:  Login, pick a number from anywhere on the planet; assign a “keyword” and match it to an email address or list!   When someone text your “keyword” to your number, the text is converted to email and sent on to that address.   The email recipient can then hit reply and we convert the email back to SMS and forward it back to the original Cell phone.  Optionally, you can build a membership list with and auto response and the ability to send a bulk text to the list!

smsportal

What is new in Version 3.1

We have released Version 3.1 and it now makes it possible to send not only text (SMS), but pictures (MMS)to the “next available agent” in your Call Center.    The application now supports:

  • Inbound SMS to email Address based on “keyword” match with REPLY ability; – this enables you to use one number and many different keywords that point to different email addresses.  The recipient can hit reply like any other email and send a response back to the sender of the SMS, usually a client who has a cell phone!
  • Inbound MMS to default email address – enables a cell phone to send a photo or picture into the customer service organization which will route to the default email address.
  • Inbound SMS to outbound SMS; – Stealth mode, you can forward an incoming SMS to another SMS.
  • SMS to List based on “keyword” match – This enables you to build an SMS marketing list.   Each list is built by “keyword” match and you are able to send auto responds and “bulk” SMS
  • Outbound email to SMS;
  • Email to SMS – enables a customer service representative to send a text from an email client.   The address can be a keyword group list or an individual cell phone number.

Each transaction has a unique “ticket” number, all transactions are searchable, logged and archived for HIPPA and PIC compliance.

We are finding that Insurance, medical, auto and tech support applications in particular are receptive to the concept of enabling clients to send a picture by text to a customer service representative.

sms1

Want A demo?

We can easily set you up with a demo account. A basic single number solution with 500 SMS credits is about $25 a month!  Send the word “DEMO”   (all ONE word, watch that auto correct) to 424-348-4000 and include your email address for an example of how this could work on a ShoreTel ECC or CISCO UCCX; or just create an account!

Note – Your do NOT need a formal call center to implement this technology.   An email distribution list to customerservice@yourcompany.com works just as well!

Call, Click or Text your Contact Center?

Mobile devices are the most ubiquitous devices on the planet! Text messages are read almost instantly, never miss their target and are high impact, high content messages. Why continue to increase the number of incoming telephone lines to your call center? All you will do is cause more people to wait on hold, lowering your customer satisfaction scores while increasing your operating costs. The call center market is moving toward “purpose built” communication solutions through smartphone aps that pinpoint customer solutions and map directly to customer satisfaction solutions. Why not allow your clients to send a TEXT message to your call center? Chances are the Caller ID will have a higher match rate to client records in your CRM system then that of a land line! You can automated the reply, or route the text to the next available agent! Your client either gets an immediate call back, or is offered a scheduled call.

Why call an 800 number, self-navigate through a maze of Automated Attendant menus only to hear the ever present “please hold for the next available agent and your call will be answered in the order it is received”. A simple text message or smart phone ap, could automated that entire process! Your client never has to wait on hold! You agent has all the contact information and can instantly reply with a return text confirming wait time or suggest a scheduled call back time. After all it is a mobile phone, we don’t have to worry about where they might be when we do call back!

Call, Click or Text! A truly unified contact center needs to offer customers a text option. If your contact center is already routing email to the next available agent, we can bring up a TEXT solution in hours, not days. Compare the cost of a text message to the cost of a phone call! Compare customer satisfaction scores with immediate text feedback when compared to and increased wait time. The benefits are astonishing!

Text the keyword DEMO to 424-348-4000 include your email and we will send you a demo account for an automated demo.  SMS numbers can be provided Internationally.  Optionally open an account at PriorityMemberServices.com and we can get your ShoreTel ECC or CISCO UCCX setup for SMS and MMS!

Configuring Compliance Recording with CISCO Workforce Optimzaiton

For compliance will you Record Audio or Screen?

There are a range of products and services that can be used to “record” phone calls on a CISCO CUCM, UCCX and UCCE. These products range in sophistication from services that simply save a wav file of a recording which you can search for by time and date, to very sophisticated recorders with advanced index and search capabilities. Some products even include speech recognition functions that can be used to search files for a particular call or even handle a recording base on the audio content.  CISCO Workforce Optimization and Advanced Quality Management adds desktop screen recording and metrics that can also be used for evaluations and service observing.

All of these products have one characteristic in common; they require you to configure a recording capability in your CUCM to copy the media stream from the target source to the recording server. There are a number of options for doing this including SPAN recording and other options that require you to configure your Ethernet switches to accommodate the recording function.  The simplest method to copy media streams is to use the Built in Bridge or BiB of a CISCO phone.  Clearly this can only work for a specific set of CISCO phones, but most phones support this function.

General Recipe!

The following is a basic general recipe for setting up your CISCO CUCM for recording and identifies some of the decisions you have to make along the way.

  • Gateway or Phone;
  • Notification or not; Notify the caller, or the Agent or both?
  • Route Pattern for Recorder along with a Partition and Calling Search Space.
  • Create a Recording Profile;
  • SIP Trunk Setup between CUCM and Recording server; and options CUCM and Gateway;
  • Identify Users and add them to the proper CTI Recording and Monitoring Group;
    CTIPemissions
  • Enable BiB on the phone;
    BiB
  • Enable Recording on the DN;  Auto always or Selective and reference Recording Profile;

Basically you are creating a conference call between the “source media”, the CUCM and the Recording server.    The actual configuration has a lot of details and you will need to carefully consider each element, but the actual setup is routine for your average deployment engineer.   We summarized them below in video format.

You can also use CISCO XML services to enable SELECTIVE recording in which a phone is recorded only on the demand of the user.  This uses the Calabrio XML api and Phone Service option in CISCO.  This will enable the user to push RECORD, PAUSE, RESUME and STOP.  The second video walks you through the configuration options for that service.  This can also be deployed in Finesse as a desktop button!

Add DNIS routing to your ShoreTel ECC Contact Center!

Why Route by DNIS?

Routing by the number the caller dialed, or DNIS is the preferred routing strategy for any Call Center call flow.  Clearly you can assign a DID phone number to a specific call flow and anyone who knocks on that door is answered by the same group of agents.   It is much more efficient to grab the DNIS information, however, and use it to index a database to retrieve the call routing information.  In this way, we only need one door to the call center!  The DNIS might be used to route a call to the proper product or service group and it may also be used to retrieve client information that the call center Agent needs to see displayed  in order to provide a custom care answer prompt.

Consider the requirements of a Hospital that is providing “centralized scheduling services” for 1000’s of primary care physicians.  When the inbound call is presented to the Agent, the requirement is that the caller be greeted with a customized answer prompt.  For Example:  “Doctor Leary’s office, are you calling to make an appointment?” or “Thank you for calling Doctor Williams”.  This type of dynamic call handling can best be managed by using DNIS information to retrieve the Doctor’s name from a database   We do this regularly in CISCO UCCX and ShoreTel ECC Call Center solutions and the process is essentially the same for both solutions.

ShoreTel ECC Route by DNIS example

First, we need to create a DNIS Map in the ShoreTel PBX; a ‘route point/IRN ‘ combination to pass the call to the ECC;  and an ODBC connector from the ECC server to your favorite SQL database server.   The SQL server would host the database your scripting application needs to access in order to obtain the correct answer prompt.  Lets assume that the database contains a very simple table structure:

DABASE = DNIS_listofDoctorsOffices = (Field1 = DNIS Number, Filed2 = OfficeName, Field3 = QUEUE_IRN)

You would then write a simple script to take the incoming DNIS information and use it to index the database and get the OfficeName and maybe the Customer Service Queue that handles that office (City or State or what have you).  There is no limit to the information you could retrieve and present to the Agent,  For example: Name, Service Class (Platnium, Gold or Silver), Renewal date, last order, shipment date, the list goes on.   In this simple example the script would take the DNIS and use a SQL expression to retrieve the answer prompt data:

Select * from DNISlistof DoctosOffices where DNIS = %DNIS_NAME%Sample ECC Script Screen

Creating a DNIS MAP in ShoreTel iPBX

In the ShoreTel iPBX Trunk Group it is necessary to create a DNIS map for two reasons:  First, the ShoreTel ECC can not read the DNIS directly, it requires the administrator to fill in the “dialed number” column in the DNIS map.  The ECC has a mandatory call profile filed named DNIS-NAME which will be auto filled with the information you provide in the DNIS map “dialed number” column.     Secondly, unlike a DID number that might be directly mapped to an extension, we need a way to get the incoming call connected to the IRN on the ECC that is running the DNIS SQL lookup  Script.   In this example, the Destination field of the DNIS Digit Map in the ShoreTel iPBX Truk Group points to the Route Point/IRN in the ECC that supports the script.


DNISMAP

POPing the Agent Display with useful Data

The ShoreTel ECC has two variables data types: Mandatory or System Variables; and User create Variables.  The Mandatory variables are system call parameters like ANI or DNIS and a long list of other system based data.   ANI contains the digits that make up the caller identification and that is also often used to retrieve database information.   If you are using ANI you will need to do some string manipulation to strip off the +1 from the 10 digit number, or format to match your database.   User created variables are the name you create for the fields you will get from your database.  Useful examples would be CustomerName, DateOfService, AccountBalance and RenewalDate.    Any Variable, User created or System,  can be pushed out to the Agent Display within the ShoreTel Communicator.

ScreenPop

What is your Call Center Application Requirement

We have seen it all, so we are always interested in your requirements for custom CRM integration and Call Flow management.  Give us call or drop us an email and play “stump the vendor”.   We would love the challenge of finding yet another new ShoreTel ECC or CISCO UCCX Contact Center application requirement!

[show_related ids=”2828, 2610 ,2447, 1378″]

Trouble Shooting ShoreTel ECC Scripts

ShoreTel ECC Future?

The ShoreTel ECC or enterprise contact center is a remarkable product in many ways.   Though we are depressed to see that it has apparently taken a back seat to ShoreTel Connect as it relates to product enhancements, it remains a formidable player in the contact center space.   Clearly, if you are deploying a ShoreTel phone system, then it may be the only viable option.    We note that ShoreTel has made a new acquisition for contact center functionality in the cloud, so the potential of supporting ECC product enhancements may even be less hopeful as product development resources shift to the “cloud” and ShoreTel Connect.

Remember EasyRun?

We have worked with the ECC since before it was a ShoreTel product.  It actually originated as an OEM product, a re-branding  of a software solution brought to market by EasyRun, an Israeli based company founded by Avi Silber, long time VP of Software Development for Telrad.   ShoreTel ultimately executed a software source code licnese and the rest is history.  Unfortunately, we seem stalled at Version 9 of ECC, which was not a major evolutionary step from ECC Version 8.

At any rate, the product does a super job in small to medium sized Call Centers and meets the minimum daily adult requirement for call center functionality.   One particular  function enables the system to integrate with popular database solutions like Microsoft SQL.   This enables the system to take on some very sophisticated applications that include routing inbound calls based on the return of data in the customer service database.  One of them most asked questions of marketing professionals as it relates to Contact Centers:  “are all customers created equal”.   You might want to route an incoming call based on the callers status in your customer database as a Platinum client or as a deadbeat on credit hold.

SQL database dips are almost essential for any Contact Center offering.   ShoreTel enables this functionality through OBDC connectors to the host SQL server or CRM system.    One of the challenges for design and implementation engineers is testing the design and results of the SQL data dip.  Historically, ShoreTel has not provided a lot of debug tools here and documentation on inner workings of the ECC is not generally available.  If you are bold and go poking around in the BIN files, you will note a lot of exe files and if you are curious, brave and inquisitive you might take on an exploration of what these files are used for.

Undocumented ShoreTel Debuggers!

One file in particular seems to launch a very useful test tool.  We have never found any documentation on it, and it has become something of a legend among we ECC implementation engineers.   If you are fortunate enough to maintain a relationship with other engineers that share information, you can build up a library of useful tools based on shared results from others.  Kudu’s to one such brilliant engineer, Bill Fraedrich for sharing his growing list of FC_Thingy functions and the other members of the development community who regularly publish results.

Route Caller by ANI (caller ID)?

Recently we had to create a SQL data dip to pull back a customer record using Caller ID or ANI as the database index.   Now anybody who has done any Contact Center CRM integration regardless of vendor, knows that you have to do some string manipulations to strip off the +1 that will be passed by the carrier as part of the ANI information.   ShoreTel ECC, CISCO UCCX, it does not matter it is all relatively the same.   Once you clean up the ANI you can pass it off as part of a SELECT command and go get your data.  Then manipulate the data to find the fields you are looking for to make your routing determination.

The undocumented debugger!

The issue becomes how do debug a script that is not producing the results your design expected?  Again, ShoreTel comes up short here as it relates to documented debug tools.   The CISCO UCCX, for example, has a step by step debugger built right into the script editor, which is really helpful for those of us who have to design, implement and test these scripts.   It turns out that ShoreTel has one as well, you just have to know where to find it.   Again it is not documented and is well known only to those that know it well.

In this video clip we take a look at the tool and show an example of how you might use it to unravel a particular SQL data dip problem.    We have found a number of these tools and we are always looking for documentation and road maps produced by those who have gone this way before!   Next blog we will take a look at a TAPI debugger that is also very useful when troubleshooting ShoreTel phone system Communicator issues.

At any rate, the ShoreTel ECC has great potential and is a wonderful solution when applied in the proper environment.   You can create some very sophisticated routing applications based on a variety of CRM integration, custom software solutions and IVR scripts.    Despite all our grumbling and complaining,  we have not found anything we cant make work on a ShoreTel ECC!

UCCX Instant Contact Center “Killer Script” $295?!

The Vision!

It has long been our vision to create a UCCX script that can be used to rapidly deploy a new Customer Service Queue.   We appreciate that each Contact Center is different, but there is a set of expectations most folks have for the basic call flow and feature sets.  Between the vision and the reality is a leap of faith, but we have emerged a Generic Customer Service Queue consisting of a small library of scripts, professionally recorded audio prompts, XML document files and supporting sub flows that, taken together,  provide a very rich call center solution.  If you are building out your Contact Center with CISCO UCCX as your call processing engine, this script will get you operational in a fraction of the time it would normally take to design and develop a script form scratch!   If you are running at least Version 8 or higher on an Enhanced license, the resulting contact center script provides a rich set of features.


Included Feature Options:

  • Auto configuration based on the Number Called;
  • Holiday List checking for programmed closures;
  • Supervisors are enabled to open and close a CSQ on demand;
  • Supervisors can record a custom closed message (meetings, emergencies etc.);
  • Call flow can provide for Language selection (Press 1 for English);
  • Each CSQ can be optioned to play estimated wait time and position in queue;
  • Each CSQ can be optioned to enable a “call back without losing your place in queue”;
  • Each CSQ can be optioned to allow caller to leave a message, bailout to operator, or arrange call back;
  • Each CSQ is checked to assure there are agents logged in;
  • Music or Message while in Queue can be optioned on a per CSQ basis;
  • Extend Call Holding Options can be offered based on max time in queue;
  • Each CSQ can be optioned to enable the processing of a list of off site agents that can accept a remote call;
  • Custom layouts can be created to push information to the Agent Desktop Display based on CSQ;

QueueOptions.XML

The heart of the script is the “Queue Options” file that is read with each new phone call received by the system.  The script then configures itself to identified CSQ options based on the called number.  The called number is used to retrieve the options for the target CSQ from an XML file.  For example, callers to the Customer Service CSQ may be prompted with estimated wait time and position in queue, while the callers to the Technical Support Queue are not offered this information.   Perhaps arranging a “call back from queue without losing your position” is a feature that is offered to Platinum callers but not to the Silver clients.  Each CSQ can have different prompts and customer care messages for those waiting for the next available customer service representative.  The options offered callers can be different for each CSQ.

Call Center Administration

Emergency closure?   Authorized users, typically the call center supervisor, is issued a PIN and Queue number.   This enables them to call the included CCAdmin IVR Module, enter their PIN number and then select the CSQ number.  They are the offered the option to open the CSQ, or close the CSQ and record a new closed greeting.    No more calling down to the System administrator every time you want to close the CSQ for a team meeting!

The script is optimized to provide the richest set of functionality based on a wide cross section of call center applications and at the lowest possible cost both for acquisition and ongoing maintenance.   As the script is both extensible and reusable, it can be used for future CSQs and as such, it will save you money on into the future!   Give us a call and we can download the script to your UCCX Contact Center, configure the options and have you up and running with a professional call flow and sound with in few hours!  Clients who purchase this option will continue to get follow on updates as we continue to add new functionality!

We have updated the Script for 2019, so watch the new video which details the new feature set!

Contact Center Remote Agent Locator!

We recently had a request for an “emergency locator” application with a different twist.   Historically, we have written a number of “locator” type scripts, but this request had some unusual requirements.   The client wanted to have live agent support for a technical support queue, even after the agents went home at end of shift.  Basically, put the caller on hold and then go find an agent to assist!   Now if agents are logged in, that is more of a remote VPN phone type of solution.  This was different, the agents were not logged in and not on a VPN phone,  but reachable by cell phone.   The requirement was that the caller should have the same experience after hours that they might have during business hours.

The Challenge!

If that was not a sufficiently large challenge, they also had multiple CSQs and that would mean processing a list of agents that was CSQ specfic.  Additionally, all of this should be reportable in the normal historical reporting process.  If an agent could not be located, an email was to be sent to the CSQ team, and the client offered the opportunity to leave a VM or request a call back.   What was different about this request for script assistance, was not that we had to locate an agent, but that we had to keep the client in the queue and somehow pass the client to an available cell phone based agent.

Not entirely sure if we could do this in a ShoreTel ECC, the CISCO UCCX has the ability to create scripts that manage multiple contacts.  The “Triggering  Contact” being the caller that launched the script, and then we need an email contact and an outside phone contact.  There is no way, however to conference or transfer the caller to an active call.   Additionally, we needed positive assurance that we reached a human and not an answering machine!  This made for an interesting set of challenges!

The Solution

The caller handling front end was a typically call queue strategy, but the back end agent locator was tricky.   First we had to create a way of searching a list of available agents.  Not a single list, but a list for each CSQ as the agent skill set was product focused.   That requirement was initially handled with a SWITCH step and later improved by use of an XML file.    We place the caller on hold, then find the first agent and call them as the second outbound contact or new active phone call.   To confirm we actually reached a human, we ask them to press any key to continue and when they press a key, we know we reached a human and not a machine.

Next we ask them to press one to accept the assignment, or two to reject the assignment in which case we have to return to the list and find another agent.  If they accept the assignment, we tell them to keep the line free as the next phone call will be the caller on hold in the queue.  We terminate the call and then retrieve the caller from hold and transfer them to the agent.

This all worked very well and we are now enhancing the features and script strategy to make the code portable and more flexible.   If the agent had rejected the call, we would send an email to management and call the next agent on the list.    We are eager to find ways of leveraging the script for more applications and welcome your input!


Upgrading CISCO with Prime Collaboration Provisioning

Don’t Procrastinate!

Sooner or later you will find you need to upgrade your VoIP deployment, regardless of the vendor.   Differing upgrades is just prolonging the inevitable and increasing the complexity and the pain level.   Let’s take the example of migrating a CISCO MCS based cluster that includes a CUCM at version 7.1.5, a UCCX at Version 8.0.2, and a Unity Voice Mail at version 5.0, and some of the components have HA options!  Having put off upgrades for some time, this client will have to migrate from MCS server hardware to vmware ESXi virtual machines and upgrade to the now current 10.X release across the cluster and applications.  In the case of Unity which has been replaced by Unity Connection, this is a completely new application addition.  The complexity of this upgrade is about as challenging as they come!   Additionally, the client expectations are that impact to the production environment will be non-existent!

Build out a “Mirror Lab” system

The decision was made to build out a completely separate “lab” system and to use the same ip topology as the production system.  This in itself is an interesting set of configurations as you will still need to maintain connectivity with all network services, particularly DNS and NTP.   This might best be accomplished with a set of temporary service providers on a completely isolated network.  In this instance we made use of Prime Collaboration Deployment  (PCD) tool to migrate and upgrade the CUCM cluster consisting of Publisher and two Subscribers.   As the “lab” network was to mirror the production network, we actually had three of four subnets to configure as the HA servers were to be located at a different site than the Publishers.   The PCD was relatively painless and very useful.  We did learn quite a lot about the capabilities of this tool, and in the end, consider it to be of great value and we will continue to use it in future migrations.   See our previous blog about lessons learned!

Plan 3 hours per server per Upgrade Step up!

Understanding the time required to complete this process should be established.  The actual time to do a backup and/or a restore of a specific server will be determined in large part by the size of your deployment.   A backup for a single cluster with 100 users will take considerably less time than a backup of a multiple cluster deployment with a 1000 users!   For planning purposes we used one hour per server for installation of software including ISO, COP files and any required Engineering releases.  Each backup added an hour as did each restore.   Keep in mind that you may be making multiple upgrades to achieve your end goal.  Each upgrade will take place in the “inactive” partition. Then you will be required to switch partitions. This process will take as long as a backup to progress!   In this example we were moving from 7.1.5 to 10.6 and that would normally be a multiple step upgrade.  In the case of the UCCX it most certainly was!  So we have, in this example three CUCM servers, 2 UCCX servers, and 2 Unity servers for a total of 7 servers.  At the base level that is a minimum of 21 hours of server operations for each upgrade step!  Plan accordingly and set expectations to all stakeholders!  There will be long periods of watching computer screens and the progress bars that hopefully give you some feel of where you are the process. CISCO upgrades list the number of tasks and also estimate the time per task.  This is very helpful!

UCCXupgradeScreen

Take time to learn COBRAS!

Once we had the CUCM cluster established, we turned our attention to the migration from Unity 5.0 to Unity Connection.  This was achieved by building out a new ESXi based Unity Connection Version 10.5.  CISCO has a great tool to assist with this migration in the form of COBRAS which, if you have not used before, will take some study.  Fortunately there are many training videos on the CiscoUnityTools.com website, where you will go to download the required software.  You will need the CISCO Unity Export tool and the Unity Connection Import tool.   The Export tool needs to be installed on the Unity Server as it will build connectors to the existing Unity configuration and User database.   The tools are not difficult to learn, but do require some orientation.   You can export the configuration including users, call handlers, mail boxes, prompts and even messages.  If you set customer expectations that they will not have historical messages, you can eliminate importing messages which will simplify the process.

The Unity Connector Import tool can be installed on a Windows laptop.  You will need to download and install IBM Informix drivers to connect to Unity Connection Server using a Microsoft OBDC connector.  In this example, we moved from a system that had many less features to a system that had many more features.  Our expectation was that this would be the most painful part of the migration journey, but it turned out to be comparatively easy.   The Unity Connection Server came up with most of the old call handlers matching definitions for new call handlers, and the user database imported with out error.  We choose not to import old messages and set an expectation with the client that there was a point in time in which they would need to clear out old messages as they would not be on the new system.

List and have available all COP files!

Now the upgrade and migration of the UCCX was in fact the most challenging part of the journey.   With the Call Manager now on Version 10.5 the current UCCX 8.0.2 system could not communicate with the call manager.  At first this was not thought to be an issue.  We backed up the UCCX 8.0.2  server and built out the same version machine on ESXi.   Then we did a restore and now had a virtualized UCCX 8.0.2.   You will not be able to log in to the UCCX administration page, however, as the user database is on the CUCM, and the two systems are currently incompatible.  There is a very long list of steps to get to UCCX 10.6 and each step required a backup and restore!  The clock is ticking!

We upgraded the 8.0.2 software to 9.0.2 and found that we need a license key to be able to log into the Administration portal.   Given that we were only temporarily stopping here, and ultimately would license under Prime License Manager, we did not plan for this.  However, we wanted to make sure that all data was successfully migrated to the new version.  So we obtained a demo license through TAC to take a look at our repositories and verify that all scripts, prompts and documents etc. were successfully migrated.   We noted that the Call Control Groups were not in place, but determined that was a result of a  Jtapi version incompatibility.   We next need to apply COP files and migrate to 9.0.2SUS2 in preparation for the journey onward.   At this point, we found a error in the database replication of UCCX servers and elected to remove the secondary server, which we would add back in at a later step.  This required TAC assistance to log in as root and run a script to strip the database of any reference to the second UCCX server.

There are hardware reconfigurations that change as you move through to 10.6 so be aware of them.  As you might have done on MCS upgrades to 9.0.2, you will add RAM and maybe disk drives depending on the size of your UCCX.    So moving from the ESXi virtual 8.0.2 clone we attempted to build out the ESXi machines using Version 10.6 OVA files, but ended up having to download and use an OVA for version 9.0.2.   The upgrade to 10.6 required yet another COP file before the upgrade could be started. Again, it is important to study the various upgrade paths as you may be moving through several upgrades, patches and COP files, so keep track and write it down!  After the COP file, yet another backup!   Finally, we were able to move to 10.6! Once on 10.6 we now needed to add the HA server back into the mix.   Actually, in the future for any multiple upgrade steps it may be best to remove the HA server before starting the upgrade.   Generally this is not a CISCO supported method, but you can see how much time it cuts out of the project as you do not have to upgrade two servers, backup and restore two servers at each step of the process!

Now that we have a complete system upgraded and virtualized, we can do some testing. Specifically working with firmware and CTL issues if any!   Though we did not have any gateways to connect with the outside world, we were able to bring up phones, assign users and make phone calls to the UCCX and the Unity Connection.   What remains is scheduling the maintenance window to facilitate the “go live”.   The plan was to take the old system offline and put the new system online.  Keep in mind we used the same machine names and IP topology in the “lab” as we did in the production environment!